Greetings!
I played my first battle in 2012 against an old friend and his Bretonnians. He didn't play much in 8th edition and he also wanted to try it out with Universal Battle. Hence my 7th game in preparation to the tournament was a simple pitched battle instead of Watchtower scenario.
Army Lists and Pre-battle considerations
My friend is known for fielding relatively large numbers of Men-at-Arms and his unorthodox approach towards Bretonnia. Hence his armies often lack the most powerful units like Grail Knights. He also decided not to have unit in his army he would not be able to field in real game (such as not assembled 2nd trebuchet). However, I never underestimate knights of Bretonnia as I have already learned that they are very resilient and very fast. As always I present the list as I remember it and I will update it later as soon as I obtain more details.
Bretonnia - Army List
Bretonnian Lord on warhorse, Dawnstone, Sword of Antiheroes, Gauntlet of Duel - General
Bretonnian Lord on Royal Pegasus, Virtue of the Ideal, Enchanted Shield
Damsel on warhorse, Silver Mirror - Lore of Life
Damsel on warhorse, Dispel Scroll - Lore of Beast
BSB on warhorse, Gromril Great Helm, Sword of Might
10 Knights of the Realm, FC, War Banner
7 Knights of the Realms, FC, Standard of Discipline
6 Errant Knights, FC
6 Errant Knights, FC
30 Men-at-Arms, FC
30 Ment-at-Arms, FC, Spears
12 Bowmen
10 Skirmisher Bowmen
Trebuchet
Quite character heavy if you ask me and I was curious how both lords are going to perform this game. Definitely not something you can see often.
Outcasts - Army List
My army had a slight upgrade in the form of Bladelord and Amulet of Light so I can have something against ethereal creatures but of course it was not the case here. I am still left with 5 points to spend on some nice item I forgot to allocate this time :) So the army list just for reference:
Archmage, Level 4, Annulian Crystal - High Magic
BSB, Dragon Armour, Shield, Great Weapon, Radiant Gem of Hoeth - High Magic
20 Spearelves, Musician, Standard,
20 Spearelves, Musician, Standard
10 Archers, Light Armour, Musician
10 Archers, Light Armour, Musician
10 White Lions, Musician, Standard, Banner of Eternal Flame
10 White Lions, Musician
9 Swordmasters, Musician, Bladelord, Amulet of Light
8 Swordmasters, Musician
8 Swordmasters, Musician
5 Dragon Princes, Musician
5 Dragon Princes, Musician
5 Ellyrian Reavers, Musician, Bows, Spears
Great Eagle
Great Eagle
Wizards rolled following spells:
Damsel - Regrowth, Dwellers
8 Swordmasters, Musician
5 Dragon Princes, Musician
5 Dragon Princes, Musician
5 Ellyrian Reavers, Musician, Bows, Spears
Great Eagle
Great Eagle
Wizards rolled following spells:
Damsel - Regrowth, Dwellers
Damsel - Flock, Pelt
HE BSB - Drain Magic, Shield
Archmage - Drain Magic, Shield, Fury, Flames, Vaul's Unmaking
Deployment
 |
| Deployment after vanguard move |
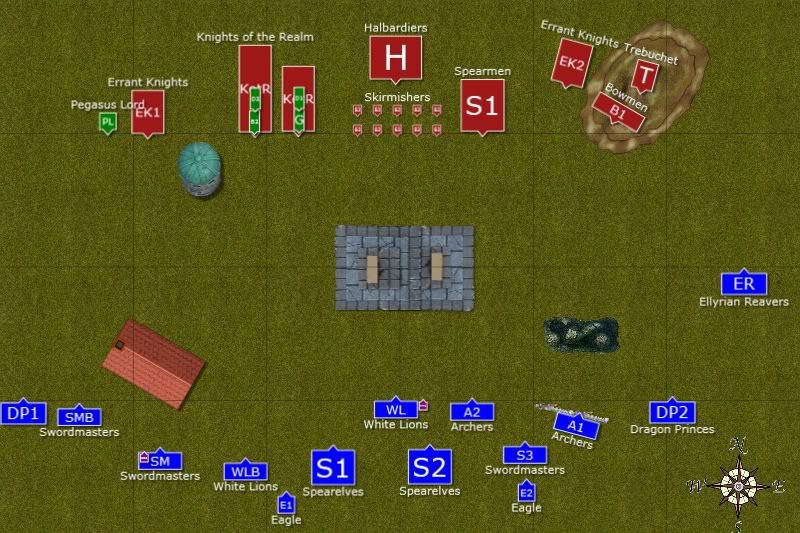
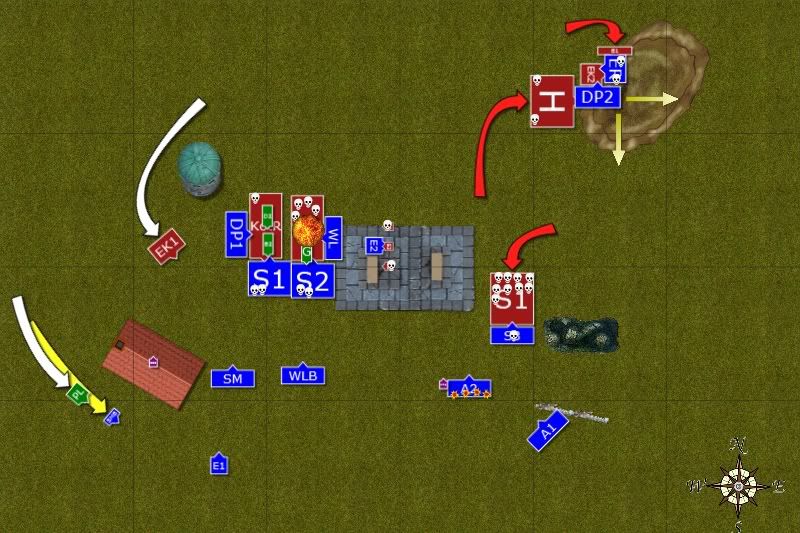
We also ended up with some quite interesting pieces of terrain. Arcane Ruins in the middle allowed all wizards in 6" to use more dice for channeling. Wizard's tower could give access to all spells from the chosen lore and brewery made units nearby stubborn. That is the reason why I postioned some of them close to it and why BSB was nearby as well.
Bretonnian General and one Damsel joined smaller Knight unit while BSB and second Damsel were with bigger regiment. HE BSB joined Swordmaster in front of the Brewery while Archmage was under protection of White Lions close to Arcane Ruins.
Bretonnians prayed as usual and HE took the first turn.
Outcasts - Turn 1
 |
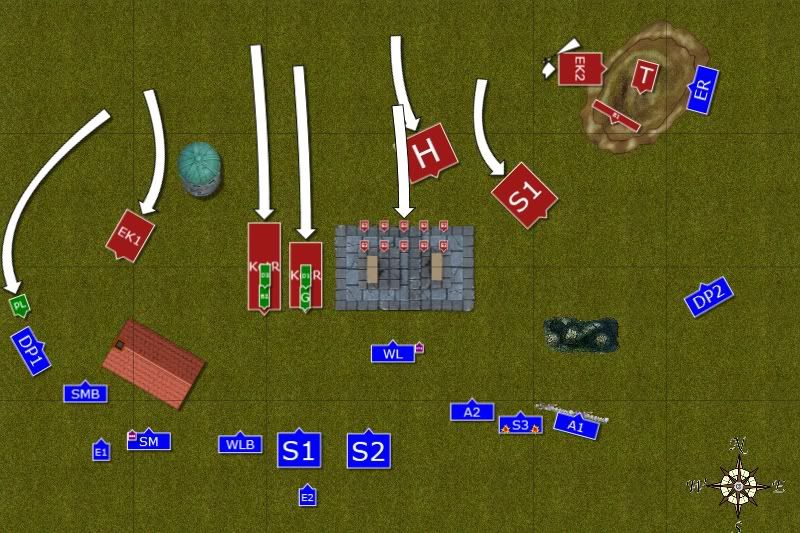
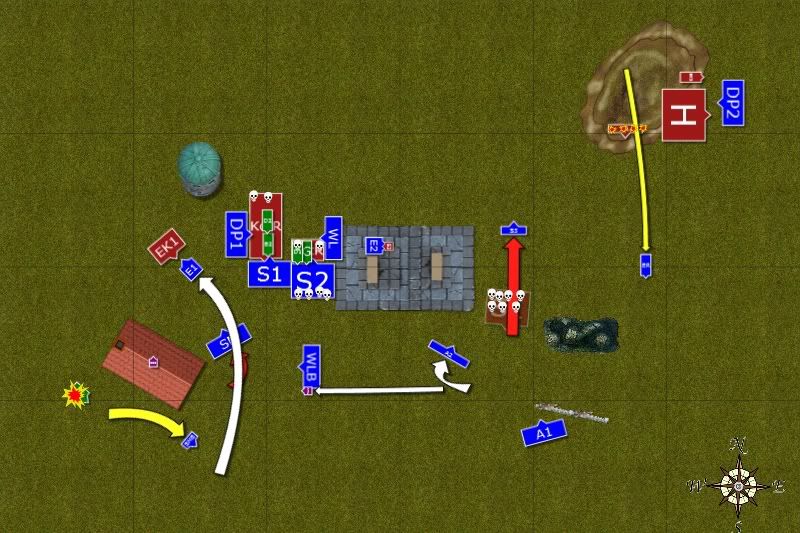
| High Elves begin their deadly dance |
High Elves seized the initiative from the start and started to carefully position their units knowing how impetous the human knights can be. On the West Dragon Princes tempted Lord on Pegasus to risk a long charge. Other units shifted closer to the Brewery. Only White Lions with Archmage moved closer to the ruins to benefit from their arcane power. On the East Ellyrian Reavers quickly positioned themselves on the far flank of the enemy while Dragon Princes moved towards the hill too.
The Archmage drew some power from nearby ruins but his attempts were dispelled. What is more one of the Damsels used some kind of magic mirror and elven wizard didn't like what he saw as his reflection at all. The archers started shooting duel and killed almost half of the Bowmen but brave peasants held their position under the watchful eye of knights errant.
Bretonnia - Turn 1
 |
| The Knights are really impetus! |
Bretonnian Knights moved towards the enemy without hesitation. Lord on Pegasus landed at the flank of Dragon Princes, while Knights Errant exposed themselves for a charge, confident that Lady will protect them. Men-at-Arms tried to keep up the pace and moved to secure Eastern flank while Knights Errant nearby the Trebuchet reformed to intercept elven light horse.
Despite drawing deeply from the magical energies both damsels could not obtain extra power from the ruins and winds of magic blew extremely weak so they could not even attempt to cast spells properly. Bowmen didn't return the favor to elven archers and aimed at warriors of Hoeth instead. Two of them died to surprisingly accurate arrows.
Outcasts - Turn 2
 |
| High Elves set up a trap |
Elves charged on both flanks in order to envelope the enemy and prevent Bretonnian units to do likewise. On the West Dargon Princes leveled their lances and charged into young but foolish knights facing them. They hit powerfully but Lady indeed protected her subjects. However, the pressure was big enough that errants broke despite the shouts from their battle standard bearer. Disciplined Dragon Princes reformed to be ready for next charge against better skilled foe.
Swordmasters readied their blades to fight against worthy foe. And worthy he was as they could not penetrate his defenses, lost two of their numbers but passed their break test. On the East Reavers had no trouble in scattering trebuchet's crew and followed with their charge into Errants behind. It is better to charge the knights than being charged and there was no space for feigned flight here anyway. Dragon Princes charged bowmen on the hill but they fled to safety. Errants tried to stop them, even resorting to killing some peasants as they run by but it didn't help.
The rest of the army performed intricate maneuver to trap both big Lances, as they didn't have much space to wheel or choose potential targets. Being close to Brewery and with BSB reassuringly waving his flag from the balcony, elven warriors were confident they could hold against the charge and other regiments were in position for powerful counter strike. Elven Archmage managed to collect enough energy to cast Fury of Khain at skirmishers occupying the ruins and archers aimed at them too. Only 4 bowmen survived but they refused to give ground.
Bretonnia - Turn 2
 |
| Bretonnians didn't take the bait and try to pull back |
Bretonnian general, remembering vaguely old dwarven stories about trusting elves, and ordered his knights to pull back. They were a little surprised but they were also disciplined enough not to question their lord during the battle. Men-at-Arms had to move on their own now and they decided to split, Spears went South towards elven battle line, while Halberds move North to support Errants. And support they needed quickly as no less than 3 of them died, although elven light cavalry payed the price and two of fast riders fell too. Errants held for now. Their companions rallied as did nearby bowmen.
On the West Bladelord stepped up and issued a challenge. He even wounded the Lord once but died shortly after. The fight, however, was far from over.
Bretonnian Damsels once again were to weak to breach magical defenses of the Archmage but 4 bowmen killed two elven archers in another display of marksmanship.
Outcasts - Turn 3
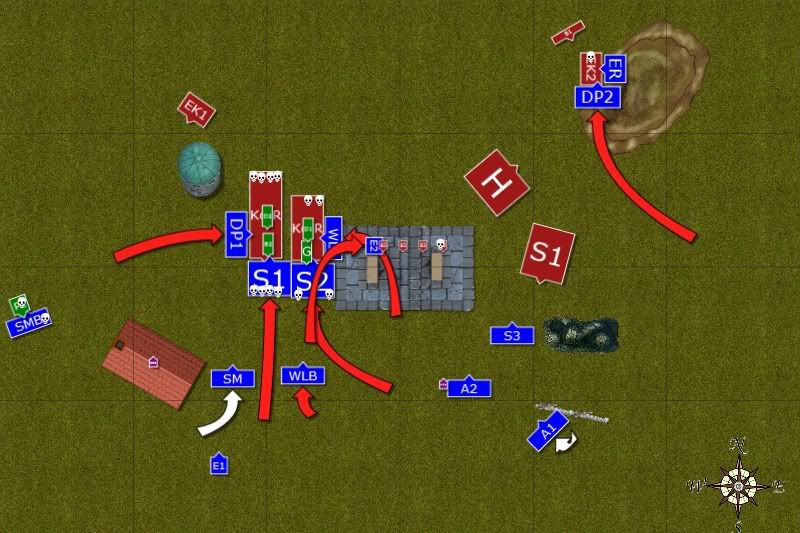 |
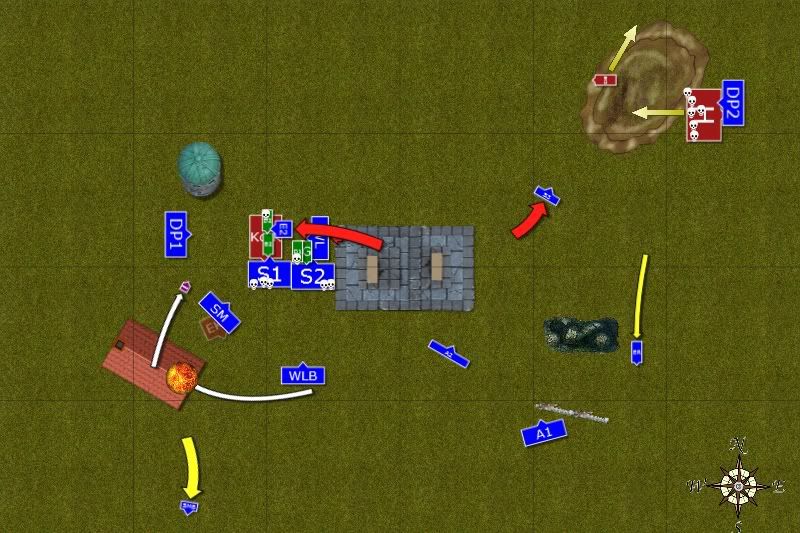
| High Elves attack from all sides! |
Dragon Princes on the East charged into the flank of Errants locked in combat with Reavers. But to the surprise of proud elven nobility, only one knight fell and his 2 companions didn't flee either! The situation on the hill does not look good for Elves as more Bretonnian reinforcements are closing quickly.
On the far Western flank Swordmasters and Lord on Pegasus hack at each other in prolonged combat, dealing some wounds to each other but neither side gives up just yet.
Great Eagle attacked bowmen in the ruins but killed only one and his comrades kept fighting. High Elves had to make a quick decision and all units charged before Bretonnians pulled back for good. Only one White Lion regiment didn't reach the target but Dragon Princes, Spearelves and White Lions hit the enemy from 3 sides in one massive combat. If they could break at least one of their units it would swing the balance into elven favor greatly. It was a vicious fight and 6 knights fell before they could strike back. More would be destroyed if not for a protection of the Lady. Hard pressed, General and BSB fought as best they could and many elves Spearmen died too. In the end the pressure of the charge meant that Bretonnians lost combat but they held bravely. Now it will be war of attrition, not exactly the most favorite type of warfare for High Elves.
Bretonnia - Turn 3
 |
| Bretonnian counter-attack |
Only units on the Eastern flank can counter charge and they do not hesitate to do so. Spearman charge small unit of Swordmasters trusting in their numbers. But illiterate peasants little knew against whom they raised they crude weapons. In a lighting fast flash of blades 9 of poor men-at-arms died before they knew what hit them. Only one lucky thrust of the spear fell down legendary warrior of Hoeth. Brettonians were visibly shaken by this display of warrior skill but the held this time.
Their brethern attacked Dragon Princes and Ellyrian Reavers and although only light horse lost some of their numbers the push of many ranks was enough to break elven elites. It seemed, however, that Bretonninas put so much effort into that combat they had not enough strength to catch their foe in pursuit.
Great Eagle manages to destroy two of the bowmen but the last survivor kept fighting while on the Western flank Swordmasters put one more wound on Pegasus Lord but could not hold any longer and two of them who have left fled away to safety. Tired Lord could not catch them however.
One of the Bretonnian Damsels, still protected by her knights, cast the spell with such power that even elven Archmage could not stop it. He was lucky enough to avoid dwellers from below but 4 of the archers who where nearby were dragged below the surface of the earth and not seen again. Five more knights died and four elves fell in deadly combat but despite constant push of elven ranks Bretonnians refused to give ground again.
Outcasts - Turn 4
 |
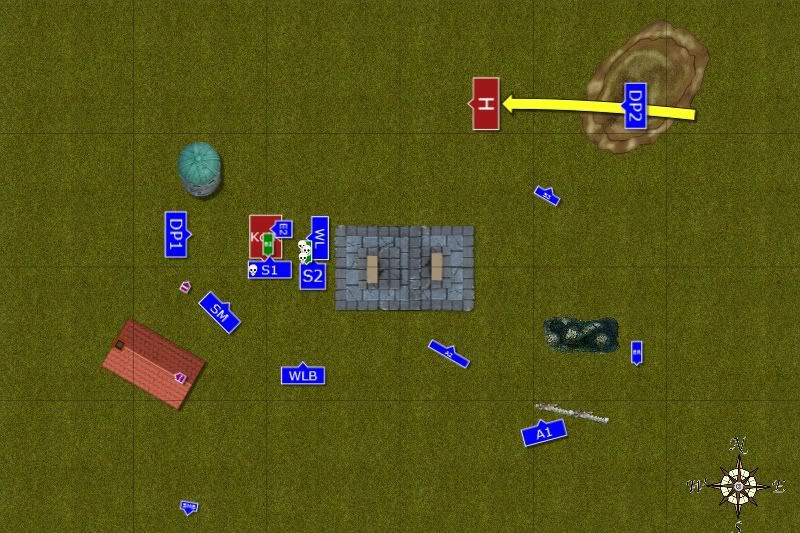
| War of attrition continues! |
Swordmasters who fought Pegasus Lord didn't rally and kept fleeing. Their companions spotted advancing Errants and charged them to prevent their attack on the back of Dragon Princes but didn't reach them in time. Fortunately brave eagle saw it and in noble sacrifice saved many elven warriors.
On the Western flank Dragon Princes rallied and readied themselves for inevitable charge. Archers aimed at bowmen again and this time no one escaped but their comrades didn't panic because of that. Meanwhile 5 Swordmasters stepped into the middle of more than 20 men-at-arms and although 2 of the elves perished they scattered bretonnian peasants to four corners of the world.
War of attrition started to hurt the Knights more than elves. Smaller unit perished and even the damsel was wounded as the General could not protect her properly anymore. Elven spears melt too but at lower rate. Still Bretonnians do not give up, true to their knightly valor. Even when their Pegasus Lord died horribly engulfed in flames sent by the Fury of Khain himself!
Bretonnian - Turn 4
 |
| Last charge of Bretonnian regiments |
Errant Knights charged the eagle, killed it and carried on into Swordmasters behind. The big combat was split into two smaller ones where Bretonnian general was fighting alone against elven spears while his trusty BSB pushed against another spears and Dragon Princes. Elven knights performed a very dangerous maneuver, pulled back from combat and only due to stoic discipline of spearelves Bretonnian knights were not able to pursuit. The eagle in the ruins finally killed last bowmen and turned to face the fighting knights. On the Eastern flank Dragon Princes not only held against the charge but also won combat and last Errant fled while Men-at-Arms muttered something about spoiled sons of nobility and kept fighting.
Outcasts - Turn 5
Outcasts - Turn 5
 |
| Elves slowly grind the knights down |
White Lions and Eagle rejoin the fight again, while Dragon Princes turn about and prepare for final strike. Swordmasters nearby destroy Earrants with easy, able to kill galloping knights before they have a chance to strike. On the Eastern flank Dragon Princes break halberdiers but cannot catch fleeing peasants. Elven mage tries to aid his warriors and destroys protective gear of bretonnian general. However, he is still tough to harm anyway. The fight still swings into elven favor, especially that both damsels are killed, their knights long dead before them.
Bretonnia - Turn 5
Bretonnia - Turn 5
 |
| Bretonnian General dies and the fate of his army is sealed |
Men-at-Arms fail to rally and keep fleeing from Dragon Princes. There is little Bretonnians can do now but they fight bravely to the last knight. Bretonnian Lord, surrounded by merciless hunters of Chrace, gives his last battle cry and dies being proud and unyielding to the last. BSB and his retinue were still fighting but not for long.
Outcasts - Turn 6
Outcasts - Turn 6
 |
| Coup de grace |
Dragon Princes attacked for the last time and all Knight of the Realm were lying dead at their feet now. Battle Standard Bearer was the last to fall in this merciless combat. From the whole proud host only single errant and some remnants of halberdiers remained.
After-battle thoughts
That was one though battle and although in the end HE prevailed it was not easy and war of attrition is not something HE do very well. Here I had 35 models engaged in combat with less than half of their number and it still took me almost entire battle to grind them down. It is a testimony to Bretonnian resilience and I only because there was lack of support from other units I managed to win this combat. I have some conclusions from this game and I will start with my opponent's army.
1. He told me his army is a transition from 7th edition with buffed up characters. It seems he is not happy with this list as it has too few support and too many points in characters. If you feel you know how to build efficient Bretonnian army in 8th edition, do not hesitate to post your ideas, I will gladly pass them to my friend as I know he wants to rebuild the army anyway (or even start from scratch)
2. Considering the game itself and his deployment I think he could do better. First of all I would hide Trebuchet behind the lines or even castled if decided to play defensively and let the enemy come to me instead. He also split his forces while holding flanks with peasantry and keeping all the lances together would be much better. Knowing I have more units and can envelope him quickly it would be beneficial as he would have some buffer before I could reach his knights.
3. I think it was a mistake to fly his Pegasus Lord so deeply and Errant Knights so close. Especially that they were away from general. It would be better to do so if they were closer with Pegasus lord positioned safely for counter charge. In that case I would not be able to attack his knights of the realm from the flank at all.
4. There was no reason for his knights to march so quickly towards my lines. I didn't really have anything to hurt him from afar. So he could wait for peasants to keep the line and my units still would be too far away to charge. Not to mention there was no reason to do so without proper positioning. His pull back was good try but he was already too close to make the charges unlikely. Besides I could keep moving my units and keep blocking his charges further.
5. There were some one-on-one fights but he didn't choose them well as both Dragon Princes and Swordmasters have too many attacks for unprotected troops to swing the balance into their favor with sheer numbers only. Especially that peasants have WS2 and were hitting on 5+ only.
In general it was not a good match up for him and he made some mistakes but I think that even with this army it would be much more difficult to win (if at all!) next time. I hope after he reconsiders some options and re-designes his army list we will have a proper re-match :)
As to my own play I am of course happy to win but war of attrition is not exactly my favorite type of fight and I think there were things I could do better.
1. I was tempted by this early charge as I know that being more aggressive usually feels good for me and can throw the enemy out of balance. I am the best at attacking and I think it showed here well. However, was that turn 2 charge too early? I must admit that my enemy had some very unlucky rolls with his attacks and with his good armor and ward saves he lost combat by 2 only which means it would easily be the other way around. I wanted second Lions unit in that combat too but they were too short. And then I could not move around to support further. This is the main thing I want to make better next time. It was good situation already, as my enemy could not help his units but there should be a way to keep my other units useful too.
2. In this game I could use Archers better as hand-to-hand troops against Men-at-Arms, especially that half of the game there were no good targets for them. I could also move Eastern DP closer to the hill and keep shooting at bowmen as it would make them more useful while DP would be in better position to either help reavers or attack Men-at-Arms together with Swordmasters.
3. At the beginning I was considering placing Swordmasters in front of the Pegasus Lord to block his line of sight but as he is bigger he could still attack DP so I think intercepting him was a good idea. Even at a cost of the unit I wounded him twice and could finish him off with Fury of Khaine.
4. I didn't really used Arcane Ruins to my benefit, should have kept that mage closer. Brewery also was not a factor although I definitely wanted to make spears and swordmasters stubborn to trap some knights. Wizard tower was too far away but in general I enjoyed the fact we have some terrain which can have an impact on the game.
I hope you liked the report and I am looking forward to reading your comments! :)
Thanks for reading!
No comments:
Post a Comment