Greetings!
Battle 3 and Meeting Engagement against Dale and his Tomb Kings. No changes to the rulebook scenario yet.
Army List and pre-battle considerations
Battle 3 and Meeting Engagement against Dale and his Tomb Kings. No changes to the rulebook scenario yet.
Army List and pre-battle considerations
Tomb Kings do not have any army list to rule them all so in theory I could expect anything. Dale decided to bring the following:
Tomb Kings - Army List
Prince on Foot
BSB, Helm of Discord
Tomb Kings - Army List
Prince on Foot
BSB, Helm of Discord
Rhamotep - special character necrotect
High Lich Priest, Neffera's Scroll, Talisman of Preservation - Lore of Nehekhara
40 Skeleton Warriors, Full Command
25 Skeleton Warriors, Full Command
28 Skeleton Bowmen, Full Command (?)
28 Tomb Guard, Full Command
4 Chariots
Warsphinx
Hierotitan
Screaming Skull Catapult
Screaming Skull Catapult
Casket of Souls
My army just for reminder
Outcasts - Army List
BSB, Great Weapon, Heavy Armour, Shield, Reaver Bow, Dragonhelm
10 Archers, Light Armour, Musician
10 Archers, Light Armour, Musician
15 LSG, Full Command
15 LSG, Full Command
10 Swordmasters, Musician
10 Swordmasters, Musician
10 White Lions, Musician, Standard, Banner of Eternal Flame
10 White Lions, Musician, Standard, Gleaming Pennant
5 Dragon Princes
5 Dragon Princes
5 Ellyrian Reavers, Musician
5 Ellyrian Reavers, Musician
Great Eagle
Great Eagle
Very good magic with 3 bound spells and bonuses from Casket and Titan. Can be quite relentless and one has to assume some spells will go through no matter what. Two catapults and a special bound spell from Casket as well as asp arrows for bowmen created a good fire base which could hurt my small units badly. Then heavy hitters in the form of Chariots (no HE army likes impact hits), Warsphinx and Tomb Guard who were also frenzied due to the presence of Rhamotep. With hatred they were very tough enemy to attack from the front so I definitely didn't want to do so.
My tactics was partially determined by the scenario as I won the roll off and had to deploy first but also knowing that I have a great chance to have the first turn. I definitely needed to take care of the catapults and with 2 units of light cavalry I believed I have a good chance to sneak them around enemy regiments and be ready for a charge turn two. Since we deployed closer to each other than normally I decided to position my own heavy cavalry in a way which would give them an opportunity for charges turn 1 if Dale deployed some of his units close enough. Of course I didn't plan to attack his deep formations but Chariots and Titan were viable targets.
On the other hand I didn't want to deploy the rest of my army too close. First of all I wanted to use all these bows to inflict enough damage so that hierophant would have a hard time to heal them back. It would also give me time to get my cavalry back into positions to attack the enemy from both sides, provided they get to their targets quickly enough. If not I would get extra space for outflanking maneuvers.
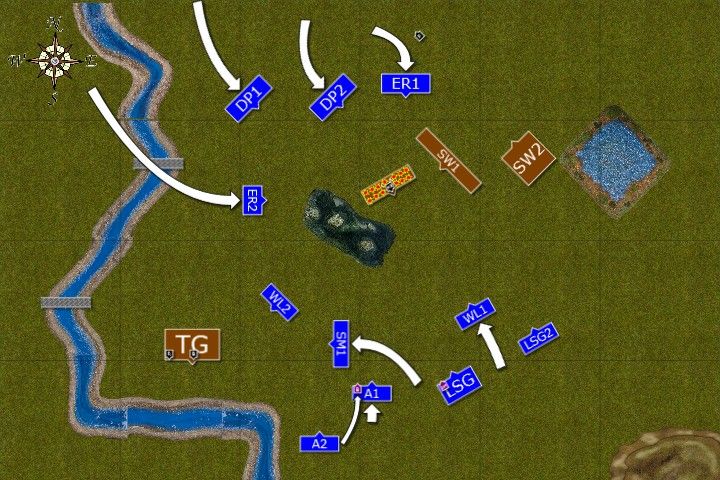
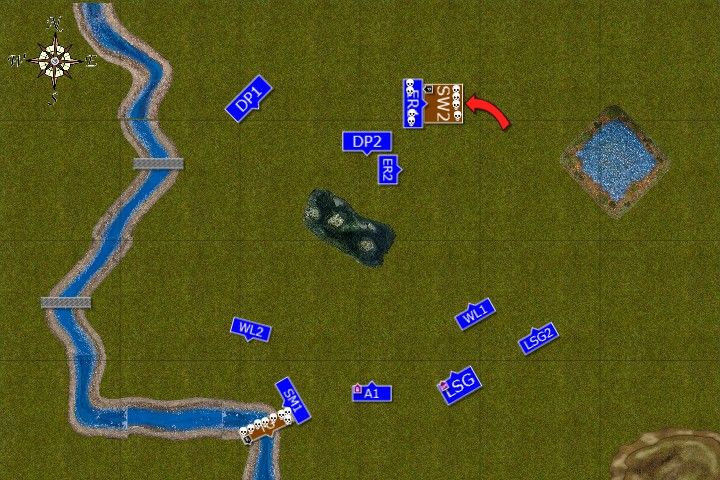
Deployment
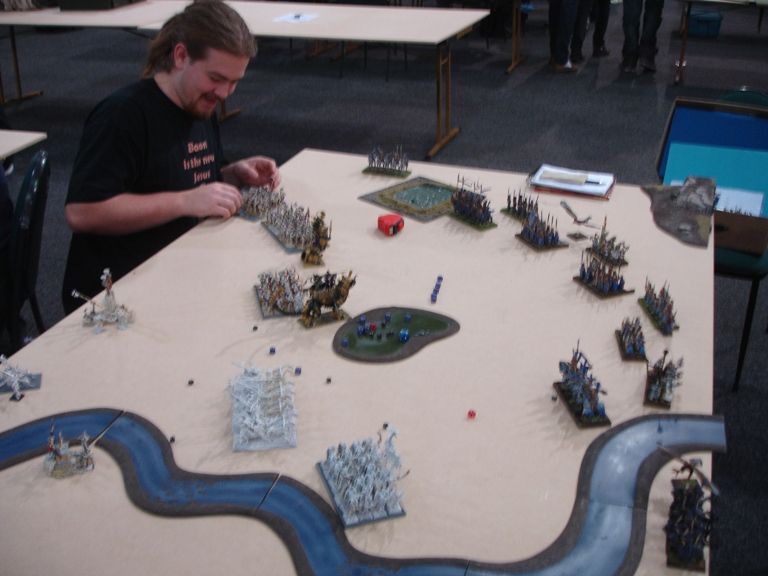 |
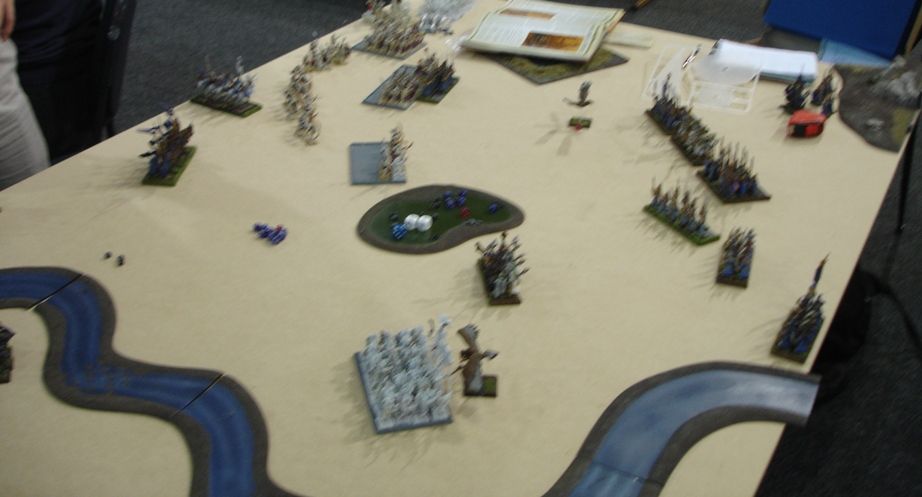
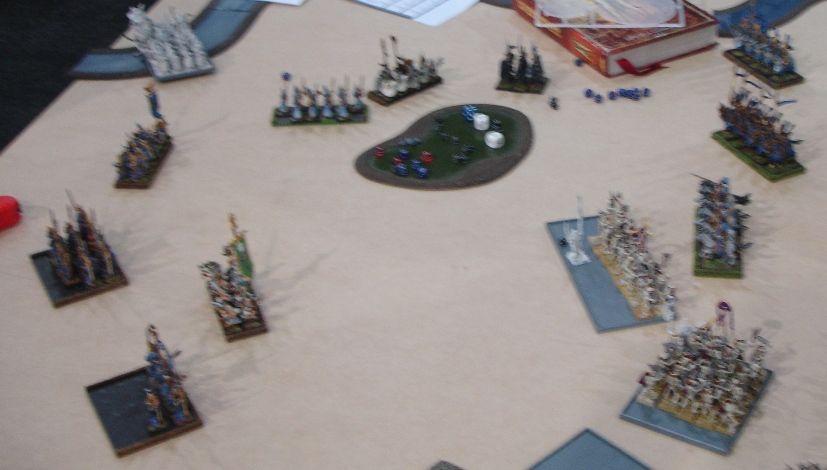
| Dale is getting his army ready. |
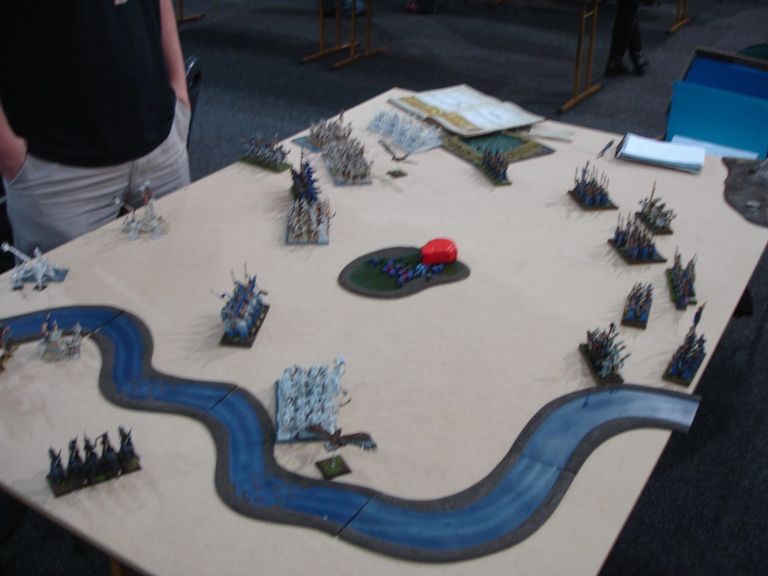
 |
| Deployment after vanguard moves |
Due to scenario rules we had to roll for each unit and characters (if they were to be deployed separately). On a roll of "1" they were in reserves. Dale's Prince was the only one who was late while in my army bsb and a regiment of archers were not yet deployed.
Wizards had following spells:
High Lich Priest - Incantation of Desert Wind, Incantation of Righteous Smiting, Incantation of Dessication, Incantation of the Skullstorm
Archmage - Drain Magic, Shield of Saphery, Fury of Khaine, Flames of the Phoenix, Vaul's Unmaking
Dale rolled a dice to see if he can steal the initiative but didn't manage to roll a "6" to do so and High Elves had the first turn.
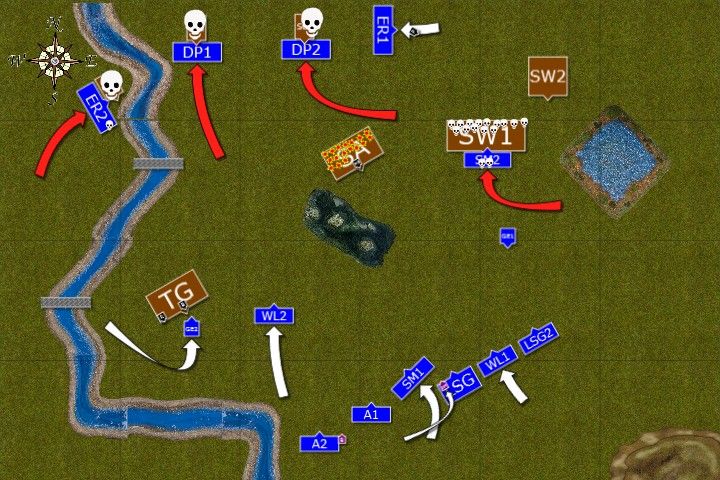
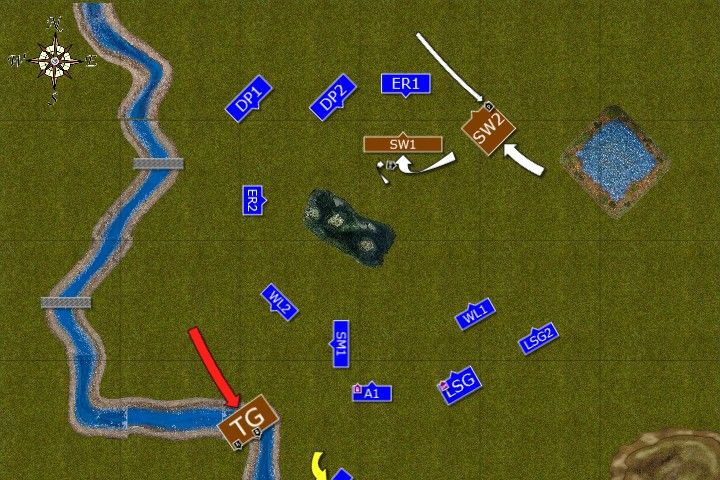
Outcasts - Turn 1
 |
| Devastating cavalry charge |
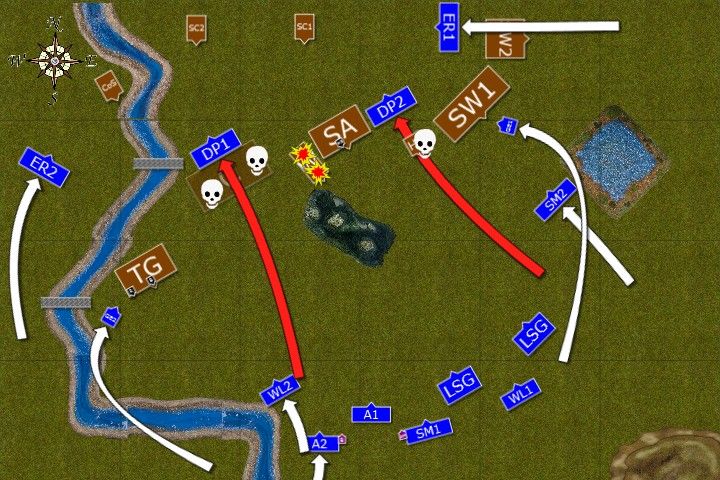 |
| Crushing turn 1 for High Elves |
Both heavy cavalry units aimed at powerful but lonely enemy regiments. On the Western flank Dragon Princes made a long charge against Chariots while on the East their companions attacked huge construct. Both cavalry squadrons hit with fury and strength of their dragon riding ancestors and enemy regiments were turned into dust while the knights used the momentum to ride past enemy infantry and directed their steeds towards now unprotected artillery.
At the same time swift light cavalry rode past enemy units with easy, using any narrow gaps in their formation and were ready to attack fragile enemy second line too.
Elven Archmage decided that at this moment a huge Warsphinx should be the priority and all ranged attacks were directed at it. Archmage himself started the barrage and inflicted a wound with his magic missile. Then unit after unit of Archers and Sea Guard (as well as BSB with Archers who just joined the fight) let lose at the powerful beast. Despite it's incredible toughness a few arrows found their marks or some weak spots in otherwise indestructible construct. Eventually the warsphinx stopped and then crushed to the ground completely broken.
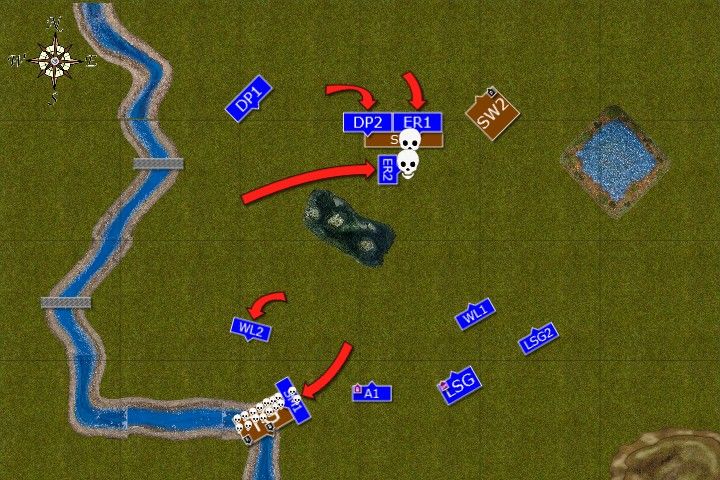
Tomb Kings - Turn 1
 |
| Despite heavy losses Tomb Kings march forward |
 |
| Tomb Prince shows up late and is enraged by the sight of damage already done to his troops |
Tomb Kings army had no other choice but to march forward and fight back. Undead artillery had one chance to inflict some damage but one of the catapults missed their target and and scattered to hit another unit while the second one killed some Sea Guard but they held.
Skeleton Warriors chased off the Eagle and bowmen aimed at it to get rid of it completely but only wounded the great bird. With hierotitan gone and a very weak winds of magic whatever spells high priest intended to cast were all dispelled by the archmage.
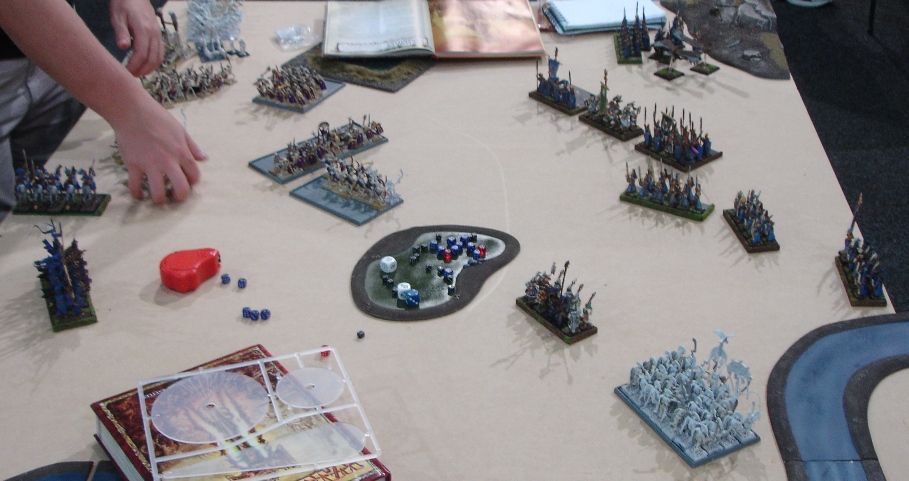
Outcasts - Turn 2
 |
| Elven Cavalry rampages at the enemy rear |
 |
| Another heavy blow dealt by elven knights |
Elven cavalry continued their very successful attack and both units of Dragon Princes destroyed enemy catapults. Ellyrian Reavers on the West killed both guardians of the Casket and it crumbled to dust but the souls freed from it claimed one of the elves too. Another unit of elven light horse moved around angry Prince to avoid his wrath.
Archmage and all bow armed regiments aimed this time at enemy bowmen and more than half of a unit perished due to such a concentration of fire, both mundane and magical. Swordmasters decided to attack approaching horde of Skeletons before the Prince could join them and destroyed many of them too. High Lich priest was really worried now as his obedient warriors turned into dust at alarmingly quick rate.
Tomb Kings - Turn 2
 |
| Tomb Kings do not give up |
 |
| Tomb Kings have a chance to counter-charge |
It seemed that Swordmasters attacked too early and didn't take into account that they might be counter-charged by another Skeleton Warriors regiment. Lich Priest managed to help his units too by casting Incantation of Righteous Smiting and even Swordmasters could not deflect so many returning blows directed at them. They inflicted some damage again but not enough to withstand the push from the flank, lost some of their own and survivors broke only to be run down. Bowmen killed the eagle at last while frenzied Tomb Guard killed another one blocking their path.
Outcasts - Turn 3
Outcasts - Turn 3
 |
| Elven cavalry comes back |
 |
| Elves set up another deadly charge |
Victorious elven cavalry returns to join the battle once more and all 4 regiments position themselves so that they can attack enemy again. On the Western flank White Lions and Swordmasters do likewise to charge Tomb Guard.
The Archmage battles in duel of the minds with High Liche Priest and wins. As a result Lich Priest finds his precious talisman broken and without any protective aura. Then archers yet again let lose their arrows. This time entire unit is destroyed and even liche priest is wounded.
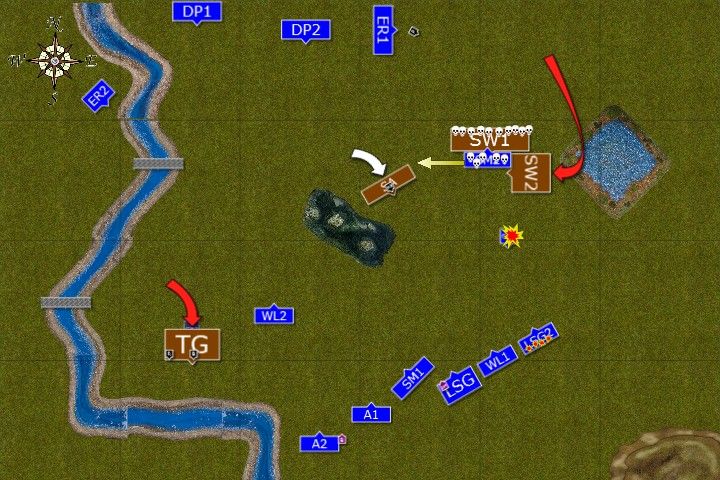
Tomb Kings - Turn 3
 |
| Tomb Kings regiments desperately try to catch swift enemy |
 |
| Tomb Guards fail to catch their enemy either |
Skeleton Warriors try to block elven cavalry and protect their Liche Priest. The Prince finally joins his unit and they move towards the enemy. Tomb Guard charges the only visible target but Archers perform tactical retreat and undead elite end up deep in the waters of the nearby river.
Outcasts - Turn 4
Outcasts - Turn 4
 |
| Yet another devastating attack by elven cavalry |
Dragon Princes and Ellyrian Reavers charge against thin line of enemy warriors and they crumble them as a consequence of their powerful charge. Even High Liche Priest cannot escape his destiny as he is attacked by another swift elven horsemen and without his protective talisman he perishes too.
Swordmasters hit the flank of the Tomb Guard but White Lions could not catch up with them somehow. Swordmasters dealt a lot of damage and lost only 2 of their numbers, also thanks to the protective Shield cast at them by the Archmage.
Tomb Kings - Turn 4
Swordmasters hit the flank of the Tomb Guard but White Lions could not catch up with them somehow. Swordmasters dealt a lot of damage and lost only 2 of their numbers, also thanks to the protective Shield cast at them by the Archmage.
Tomb Kings - Turn 4
 |
| Last charge of Tomb Kings |
Tomb Prince ordered his attack at light horse who held to protect another regiment. They lost all but one warrior but he refused to give ground. Tomb Guard kept fighting but Swordmasters again destroyed many of them and even BSB perished in combat but a few of the undead warriors still remained together with necrotect.
As there was no chance for Tomb Kings army to destroy at least some of the enemy Tomb Prince disengaged and withdrew with few remaining warriors.
After-battle thoughts
I was extremely happy with the result of this battle and I admit I didn't expect I could be so successful. First turn attack was really devastating. Dale lost 3 of his powerful units and his army was now spread out too much to enable different units to support each other. What was even worse the cavalry was in a perfect position to destroy his artillery and Casket of Souls. In 2 turns he lost his heavy hitters, artillery and his magic was significantly weakened without casket and titan. After that he simply wanted to get some points back which was difficult due to the distance to my infantry while cavalry was to fast for him to catch.
I was lucky for sure at the beginning of the game. Although charges requiring 8/9+ for heavy cavalry are not that unlikely to happen I still could have failed them. I would pull these two units a little back though, just to make the attempts a little more difficult. Wounding titan on 5+ is not great but on the other hand I had that charge and with S5 I also reduced armor save properly. So when Dale failed to inflict even a single casualty I won by large enough margin to kill the titan outright.
Shooting at Warsphinx was lucky too but I wanted to do so anyway. I had nothing to lose, with so many bows I can roll enough 6's and his 5+ armor save gives me a chance to actually inflict that damage. I had 2 rounds of shooting and magic before it could attack my regiments and I simply wanted to injure it so that I would have a chance in close combat too. Since I managed to do so in a single turn I was very happy indeed. As Dale commented after a game it seemed I figured out how to deal with it as number of attacks and not their strength is really they key here.
I think I made a mistake with Swordmasters on the Eastern flank though. I didn't check that flank charge as without it I was confident they would be able to grind the skeletons down in 2-3 turns. If I checked that I could have waited for the enemy to come to me and prevent the counter-charge. Also the failed charge of the White Lions at Tomb Guard was a little unlucky as it was 5 or 6+ roll to make but hey, I do not complain at all considering how much luck I had in the first place. What is more another turn would see them destroyed anyway.
I should not hold with Reavers in that last turn as fleeing units do not give victory points but I Dale really wanted to charge anything. It must have been very frustrating game for him and I appreciate he did his best to keep going nonetheless.
Thanks a lot for a game Dale! I am sorry it went so badly for you from the start as I honestly didn't expect my army can be so devastating from the very start.
Thanks for reading! Cheers!
No comments:
Post a Comment