Greetings!
The battle defying the limitations of time and space was fought between Outcasts and Lizardmen led by US Master player, Hinge himself! It was a great honor for me to be challenged to the personal duel and we have already discussed some details of the upcoming game in my army blog. Forgive me then, that I simply copy paste the army lists and some of my initial thoughts on the army I was about to face.
Lizardmen - Army List
Slann Mage-Priest, General, Level 4, Channeling Staff, Focus of Mystery, The Harmonic Convergence - Lore of High Magic
Saurus Oldblood, Great Weapon, Light Armour, Scaly Skin, Cold One, Talisman of Preservation, The Other Trickster's Shard
Skink Priest, Dispel Scroll - Lore of Heavens
Saurus Scar-Veteran BSB, Great Weapon, Cold One, Armour of Destiny
Saurus Scar-Veteran, Cold One, Biting Blade, Dragonhelm, Dawnstone, Ironcurse Icon
Skink Chief, Terradon, Relic Sword, Charmed Shield, Dragonbane Gem, The Egg of Quango
23 Saurus Warriors, Shields, Full Command
10 Skinks Cohort, Javelin, Shield, Standard, Musician
10 Skinks Cohort, Javelin, Shield, Standard, Musician
10 Skinks Skirmishers, Javelin, Shield
10 Skinks Skirmishers, Javelin, Shield
10 Skinks Skirmishers, Javelin, Shield
5 Chameleon Skinks
5 Chameleon Skinks
3 Terradon Riders
Salamander Hunting Pack
Salamander Hunting Pack
6 Cold One Riders, Musician, Standard
2 Jungle Swarm
Slann Mage-Priest - Slann Mage-Priests are among the best wizards in the game. This particular one is going to be very efficient with channeling as he will have 3 attempts to do so per phase and +1 to all of them. That means Hinge will roll 3 dice and on 5+ he will channel. I need to assume that Slann will have an advantage in casting and it will be very difficult to get spells through. On top of that he knows all the spells from High Magic. That is huge.
Drain magic will be very useful to get rid of any augments and hexes I might be lucky to get through. With extra dice in his own magic phase it will be quite a possibility.
Soul Quench is very annoying spell against my small regiments. As they are lightly armored S4 is actually deadly. Even boosted version is not that difficult to cast for the Slann. The only hope is that short range will make it less useful. However, I need to remember that it can also be cast through skink priest as a vessel. Because it can be used as such in 24" it gives a fantastic opportunity for the Slann to stay away from trouble and have an effective range of 42"!
Aphotesosis will be very helpful to keep the other characters alive. Mighty as they are they still can be hurt but healing them to the full number of wounds is going to be very handy.
Hand of Glory is another subtle spell. It looks like Hinge might not need it that much but since we are going to play the game of movement, making his regiments faster will be helpful for sure. The same goes for WS and BS, where the small bonuses may start to stack with the influence of other spells.
Walk Between Worlds is a spell I would love to have myself. Even better than Hand of Glory for movement purposes. Allows to reposition regiment further and hopefully catch the enemy unguarded. Making the unit ethereal is also a good protection in itself.
Tempest is probably the least used spell of the lore but I expect that this template may affect my army in indirect way. For example, units are not allowed to move through it so it can be used as movement restriction too.
Arcane Unforging is perfect spell to fight these Chaos Sorcerers but against my army there might be fewer targets. Nevertheless, taking away wounds from my fragile characters is going to help anyway and if they start losing their few precious items - the better! For Hinge of course :)
Fiery Convocation may not be that useful on my regiments but I expect it may be cast at the beginning just to draw some dice either in the turn of casting or later. If it goes through I will lose a unit very quickly. I may not lose many in one go (although the odds are against me with S4) but the casualties will be more meaningful.
Then the lore attribute will allow to shuffle that amazing pool of spells further, making it quite difficult to predict what the dangers due to magic phase will be present the following turn.
I think the Slann will start the game with Saurus Warriors but if the situation permits, he can as easily start wondering on his own and let the Saurus carry the war to the enemy, led by their stalwart Veterans. It would protect the Slann indirectly but would allow to put more pressure on my units.
It will be very hard to get to that Slann as there are too many regiments in between. And if he stays with Warriors it will be even harder. But I will need to try or find the opportunity to do so as his magic can be very powerful indeed.
Saurus Oldblood - Scar Veterans are mean but this guy is the meanest of them all. With 1+ armor save and 4++ ward as well as T5 he is very hard to kill. With 5A and Predatory Fighter rule he is going to kill a lot all by himself. His WS6 may not be that high but against majority of units it is enough. His S7 is an overkill against my army though :) He is fully capable of taking on some units on his own too.
I expect him to start the game in one of the Saurus regiments but I am sure Hinge will always be looking for an opportunity to use him solo. Or with other Veterans. Magic may help to get rid of that guy but it will be very difficult even if I manage to get through the Slann's defenses. He may lose a wound or two in combat but again, that is not something I can count on.
Skink Priest - Very, very helpful character. His main role, in my opinion, is to extend the range for spells for the Slann and keep big toad safer. With so many skinks around he will have enough protection and will be able to jump from one unit to another if needed. His Dispel Scroll is very handy but I am not sure if Hinge is going to need it! On top of that Lore of Heavens is very good too. Although I don't think Hinge will take comet or chain lightning for him, even if he rolls it. Iceshard Blizzard is very useful spell anyway.
If the opportunity presents itself I would try to get him because it will limit the area Slann can affect the battle field with his spells.
Saurus Scar-Veteran BSB, Saurus Scar-Veteran - The other two of the three amigos! BSB is again very well protected, 1+ armor save and 4++ ward. Isn't it amazing how these tough guys can be made even tougher? They already have T5 to start with but no, they have to have 1+/4++ saves to keep them "safe" :) With two Saurus leaders sporting S7 and one with magical attacks, S5 and armor piercing, they present quite a flexible range of close combat prowess. Second Veteran does not have ward saves but he still has respectable 1+ save that can be re-rolled. I am not sure which one is worse. On top of that he has 2++ against fire. Which is amazing against certain spells :)
From my experience I can say that I am capable of dealing with any of these alone. But if they decide to come at me together or even in pairs, I will be in big trouble. In fact, I expect their respective units to be delivery system and even if they die on their way I will be hard pressed by these guys alone.
Skink Chief - As if I didn't have enough trouble I have to deal with this guy too! :) Relic Sword will not matter much against my army. He has 3+ armor save if I calculated correctly and will be hard to knock him down with magic missiles because of his Dragonbane Gem. But the biggest threat is his Egg. I lost full unit of Lions to that damn item!
He can also vanguard and timely walk between worlds will help him to be where he needs to be - behind my lines. I expect he will use terrain to sneak around or his fellow terradon riders to get some extra penalties to hit. And just for fun it will drop a rock on my head too :)
Saurus Warriors - Anvil of the army but even with just one Scar Veteran they can be very dangerous. Well, in fact I lost to the unit like that without veterans in it too! My first impression was that they would serve as Slann bodyguards. But the more I think about it the more I am convinced it does not have to be the case.
Hinge has a great option to keep one cohort at the back and move Slann only when needed, using priest as a vessel and Saurus Warriors with any of the Amigos aggressively. The good thing is that there is only one unit of them.
They are not invincible but are very resilient and require to be isolated and attacked by few units of my own. It will be very, very difficult!
Skinks Cohorts - Banner bearers for the Blood and Glory, fast although less mobile than skirmishers. They don't have the same effective range for shooting either. Shield and scaly skin are quite good against S3 attacks. No penalty for moving and shooting is a bonus. They are there to serve multiple roles. Apart from banners for scenario I mentioned, they can be used as additional redirectors. They can be small bodyguard units for wizards. They can even disrupt the flanks against small units if unchecked and given the opportunity.
Good, cheap, annoying :)
Skinks Skirmishers - 3 clouds of skink skirmishers will be there to take away a few wounds from lightly armored infantry, slow down the advance, redirect and be even more annoying than cohorts. In theory, can be panicked but it will depend on the position of the Slann and Saurus leaders.
Again, javelins have the advantage of no penalty for movement, making their effective range very good. The thing is they need to be close to actually use them. Range is 12" which will probably be more like 10" away to allow second rank to shoot. And that can bring them into the charge range of my troops.
Chameleon Skinks - These guys are more efficient than regular skinks due to blowpipes and better BS. Potentially improved by Hand of Glory. They are always a priority for magic missiles as they are really hard to hit.
Terradon Riders - Some more annoying skinks! This time flying ones! They can be very helpful in war machine hunting, will provide protection for the chief if needed, will drop some rocks for good measure and if they die nobody cares anyway! Yet, as many of these skirmishers, they cannot be ignored.
Salamander Hunting Packs - Now these guys provide more serious damage output. Flame template it perfect against MSU army with T3 and 5+ armor save across the board. It is somewhat mitigated by the shorter range but they will get there shortly. What is interesting is that single salamander packs can actually be very good redirectors and additional units to block unwanted charges. They are also expendable. And not that easy to deal with as they might not be easy to reach.
It is some kind of a pattern here. Small, expendable units but with additional skills that make them dangerous enough not to be ignored. Win-win situation for Hinge. If they attract attention, they divert it from big guys. If they are ignored, they will be even more annoying and add to the number of casualties suffered.
Cold One Riders - Hammer unit. Excellent line breaker, with or without characters. I expect BSB to join them or be nearby simply to avoid unnecessary stupidity test failures. They are very good at grinding the enemy too since each model has 4 attacks. Prime target for Searing Doom!
If they charge the elite infantry I will be able to take some with me but I don't have high hopes in one-on-one combats against these guys. Flank charge from Dragon Princes would be ideal but I don't think I will be offered such an opportunity :)
Jungle Swarm - I hear that Hinge took these because he didn't want to paint any more skinks! :) They are still very useful and as many other regiments, cannot be ignored. The good thing is that Swarms crumble in combat. The bad thing is they have many attacks per base.
Overall I think it is a very, very tough army for me to take on. It has huge built in flexibility, with characters and regiments able to perform multiple roles so it will be hard to predict what they are going to do next.
On one hand the army can advance aggressively to use its shooting potential, that is significant but the regiments have short range. On the other, the army can as well sit back and try to use magic and Salamanders to convince me to come to them if I want to grab some points.
I think Hinge will not be defensive but at the same time he told me his army is not earning points early. That means he will spend time positioning regiments carefully and move them around to get the advantage.
He has 11 deployment drops + characters + 2 scouting units meaning I am at no advantage as to the deployment. He has 10 support units (2 cohorts + 3 skink clouds + 2 chameleon + terradons + 2 salamanders + swarms) and all of them can do damage at range. The are not great in combat so there might be a chance that my own regiments could take on them close and personal but there as well might be a lot of fleeing to put my units in vulnerable positions for counter attacks.
The large amount of support is perfectly balanced by the 2 hard hitting regiments and powerful characters. Three amigos can do a lot of damage all by themselves but flying chief is a danger in his own too. On top of that I will be at huge magic disadvantage.
I perceive my strengths in the following areas:
1. Combat against support troops
2. Better range for the shooters
3. Initial advantage in magic missiles (unless Hinge is going to roll and keep chain lightning :))
I am definitely weaker in:
1. Magic in long term
2. Combat with big guys (2 saurus units + 3 amigos)
I think I will need a disciplined battle line that allows for movement but without leaving openings to back door and presenting constant threat of being charged for support elements of LM army. I still don't know if Hinge is going to keep his units relatively close together or is he going to form two battle groups around both Saurus regiments. He can do both and both approaches will be viable.
I took 2500 version of the list I took a few times recently.
Outcasts - Army List
Larry the Loremaster, Earthing Rod, Dragon Helm, Talisman of Endurance
Bob the BSB, Dragon Armor, Golden Crown of Atrazar, Shield of the Merwyrm, Ring of Fury
Nasher the Noble, Dragon Armor, Barded Steed, Enchanted Shield, Star Lance, The Other Trickster Shard
18 Archers, Full Command
15 Sea Guard, Full Command
5 Ellyrian Reavers, Musician, Spears, Bows
5 Ellyrian Reavers, Musician, Spears, Bows
5 Dragon Princes, Musician, Banner of Eternal Flame
5 Dragon Princes, Musician
12 Swordmasters, Bladelord, Musician
12 Swordmasters, Bladelord, Musician
10 White Lions, Musician, Standard of Discipline
10 White Lions, Musician, Gleaming Pennant
5 Shadow Warriors
Eagle Claw Bolt Thrower
Great Eagle
5 Sisters of Avelorn
We quickly moved to the deployment phase as only Skink Priest had to choose his spell and Hinge opted to take Iceshard Blizzard
Hinge won the roll off and he chose South to deploy his army.
Deployment
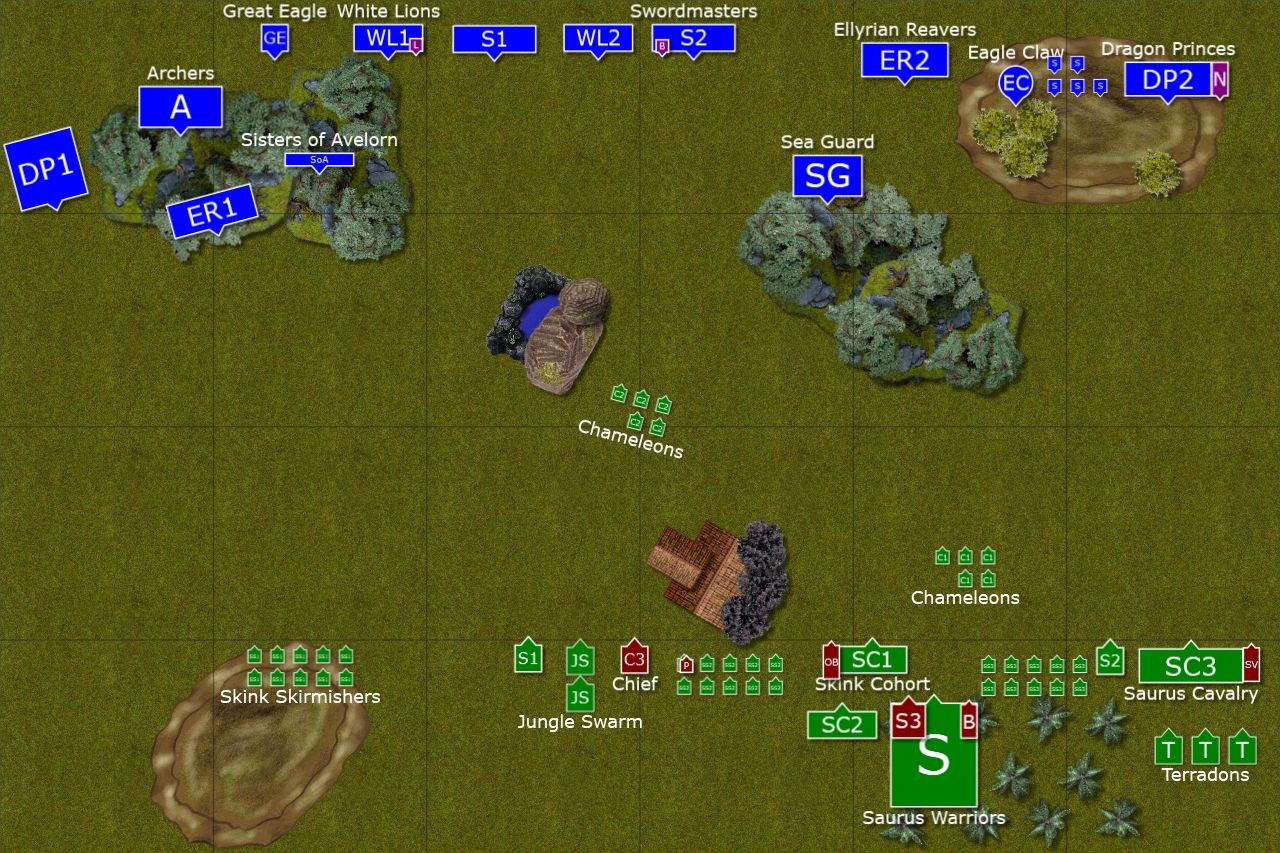 |
| Deployment after Vanguard moves |
Deployment order was (I won the roll off so I started):
Reavers, Skinks, Reavers, Cohort, Sea guard, Swarms, Eagle, Skinks, Archers, Skinks, SM, Salamander, SM, Saurus, Lions, Salamander, Lions, Cold Ones, Sisters, Cohort, Eagle Claw, Terradons, Princes with the banner, Lizardmen Characters, Rest of HE army.
Hinge won the roll off to deploy scouts and he put the first unit close to the rocks. I chose to deploy Shadow Warriors next to eagle claw. Second chameleons were then positioned in the open. Hinge decided not to vanguard and I moved reavers to the left to get protection of the forest and to the back, near the hill and move away from chameleons.
With +1 for deploying first, Hinge seized the initiative and claimed first turn.
Lizardmen - Turn 1
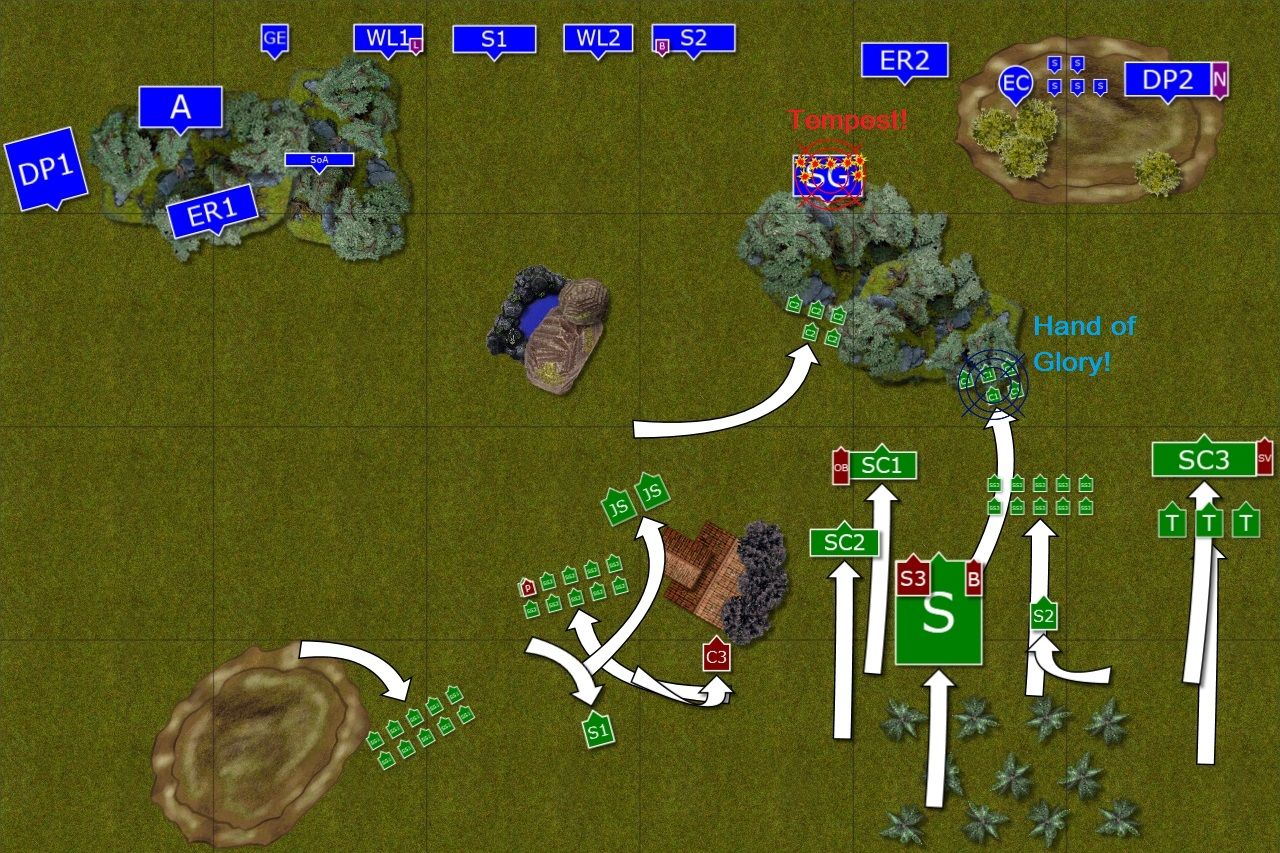 |
| Stegadon formation on the go! |
Obeying the order of the Slann, Old Blood leads his army and he leads by example, from the first rank. It is the Slann, however, who draws the first blood. Larry the Loremaster feels the mind of the superior wizard very well but he does what he can to limit the impact of the powerful spells anyway. Larry focuses on dispelling a single spell as it gives him the best chance to prevent that instead of dispersing his efforts. Sensing that the Slann tries to teleport his Chameleons into a position to attack Eagle Claw he stops it. Unfortunately, the Slann is free to cast Tempest on the Sea Guard and a few brave marines die. Then, he enhances the shooting abilities of the Chameleons who kill few more sea guards. Depleted unit holds bravely.
Turn details
I decided to add a few details to the story line from the point of view of the game itself as I had the opportunity to save all the rolls during the game (UB advantage over real games!). I will add these for magic as I think it is interesting to see how that phase worked for both of us.
Winds of Magic: 3,8
Channels: Slann 1
Power Dice vs Dispel Dice: 9-5
Spells:
Walk Between Worlds: 3,4,5 --> Dispelled: 2,5,5,6,6
Tempest: 2,2,5,6 --> Changed to the Wyssan's Wildform via Lore Attribute
Hand of Glory --> 4 --> BS + d3 = BS6 chameleons
Outcasts - Turn 1
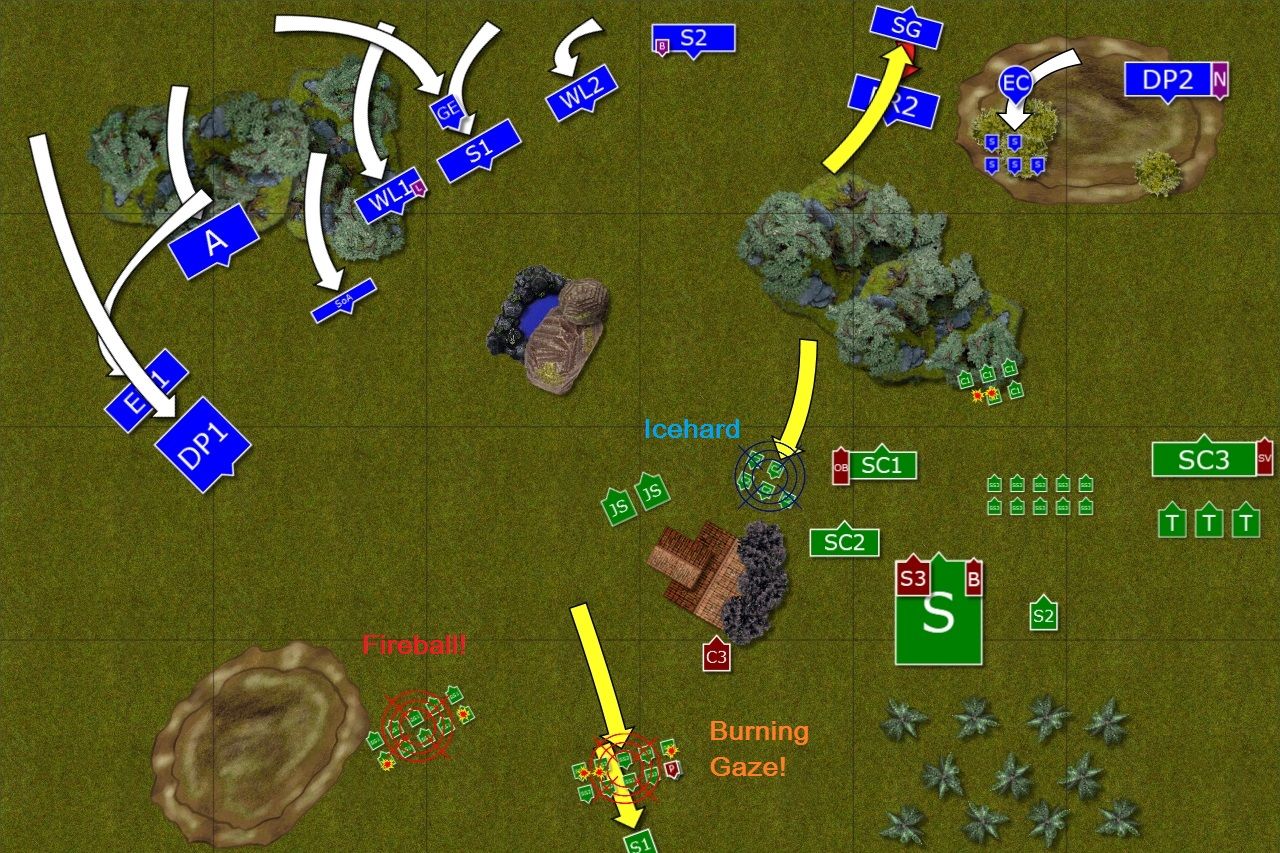 |
| Elves strike back with magic too |
Seeing that the enemy is almost entirely deployed on a single flank Elven army speeds up to close the gap and attack the lizardmen from the side. Depleted Sea Guard charges nearby Chameleons but their accurate fire kills some more Elven marines and they decided to withdraw, take the fallen with them and regroup. Reavers charge in instead but the Chameleons are long gone (Edit: I tried to redirect into second unit but failed the test to do so)
Larry the Loremaster is determined to fight back and this time he adopts the multiple small spells tactics. He first casts Burning Gaze on the unit of skinks protecting the priest, incinerates 4 of them and the rest takes away their leader to safety. That confuses the hunting pack nearby that withdraws deep into the jungle. Iceshard blizzard engulfs retreating chameleons but it might not be enough to undermine their resolve due to presence of the Slann. Another unit of Chameleons founds itself among strange shadows but Slann does not let it be. That distraction, however, allows Larry to cast a Fireball at another Skink cloud but it seems that his resources were spent and only two skirmishers died.
Turn details
Winds of Magic: 4,5
Channeling: Larry - 1, Slann - 1
Power Dice vs Dispel Dice: 10-6
Burning Gaze: 5,6 --> no dispel attempt --> d6 = 5
Iceshard Blizzard: 2,4 --> no dispel attempt
Miasma on Chameleons: 2,4,5 --> dispelled: 1,3,5,5
Medium Fire Ball: 5,5,6 --> dispel attempt: 2,3 --> 2d6 = 1,4
Lizardmen - Turn 2
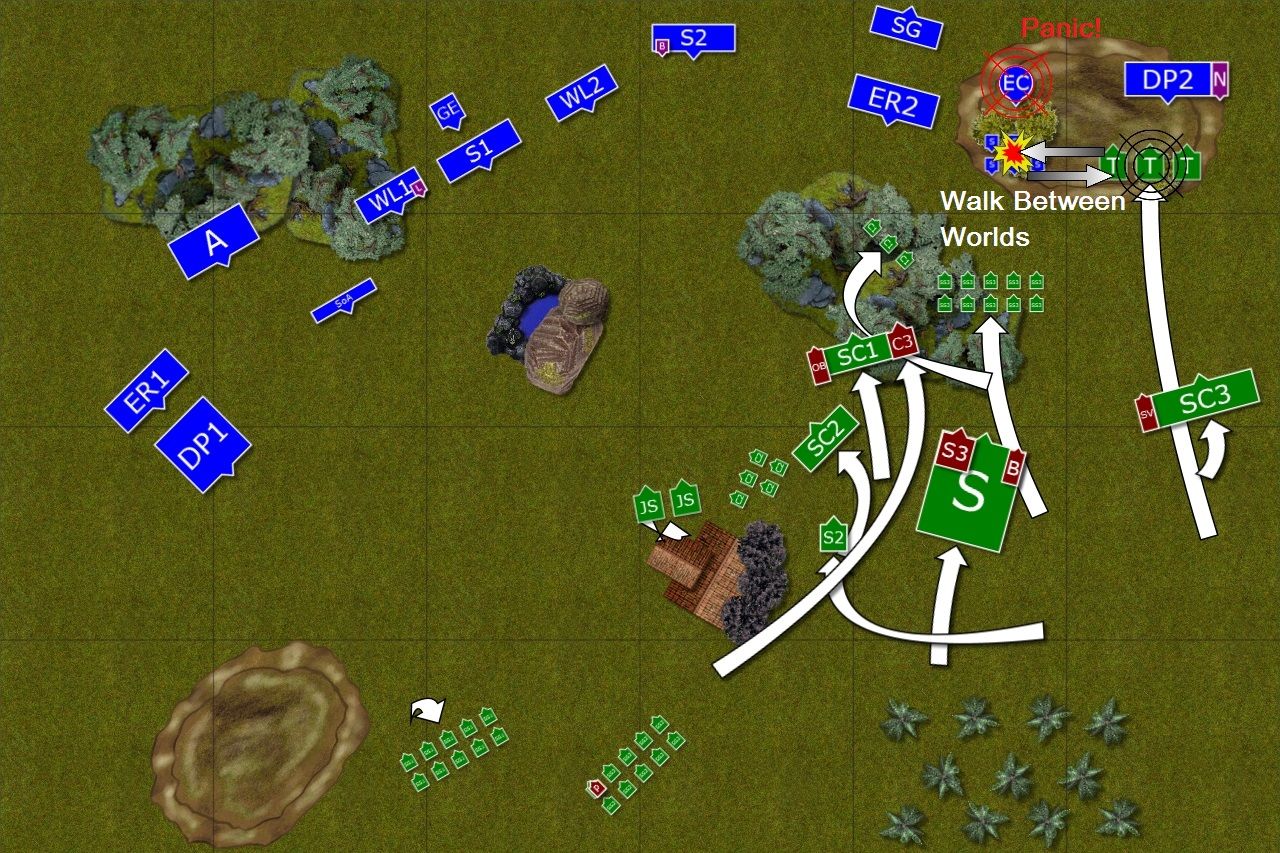 |
| Lizardmen keep pressing on the right flank |
Lizardmen troops keep pressing forward while the light cohorts guard the left flank. Terradons, fast on their own, move even faster on the wings of a spell and use that extra movement to drop rocks on Shadow Warriors who stood no chance to survive that bombardment. Their untimely end shocked nearby Eagle Claw crew that they froze and stopped attending their powerful war machine.
Larry could only watch as the spell was cast with irresistible force and even the magical feedback didn't disturb the coldblooded peace Slann was in. His vessel, skink priest was hurt though. Larry was determined to fight back in dispelled another spell casting attempt with perfect execution.
Turn details
Winds of Magic: 3,3
Channeling: Slann - 2, Priest - 1
Power Dice vs Dispel Dice: 9-3
Walk Between Worlds: 2,6,6,6 --> Miscast Result: 3,5 --> Slann: 1 to wound, Priest: 6 to wound, 1 power dice lost
Unforging: 3,3,5,5 --> dispelled: 6,6,6
Outcasts - Turn 2
 |
| Elven attempt to stall Lizardmen advance |
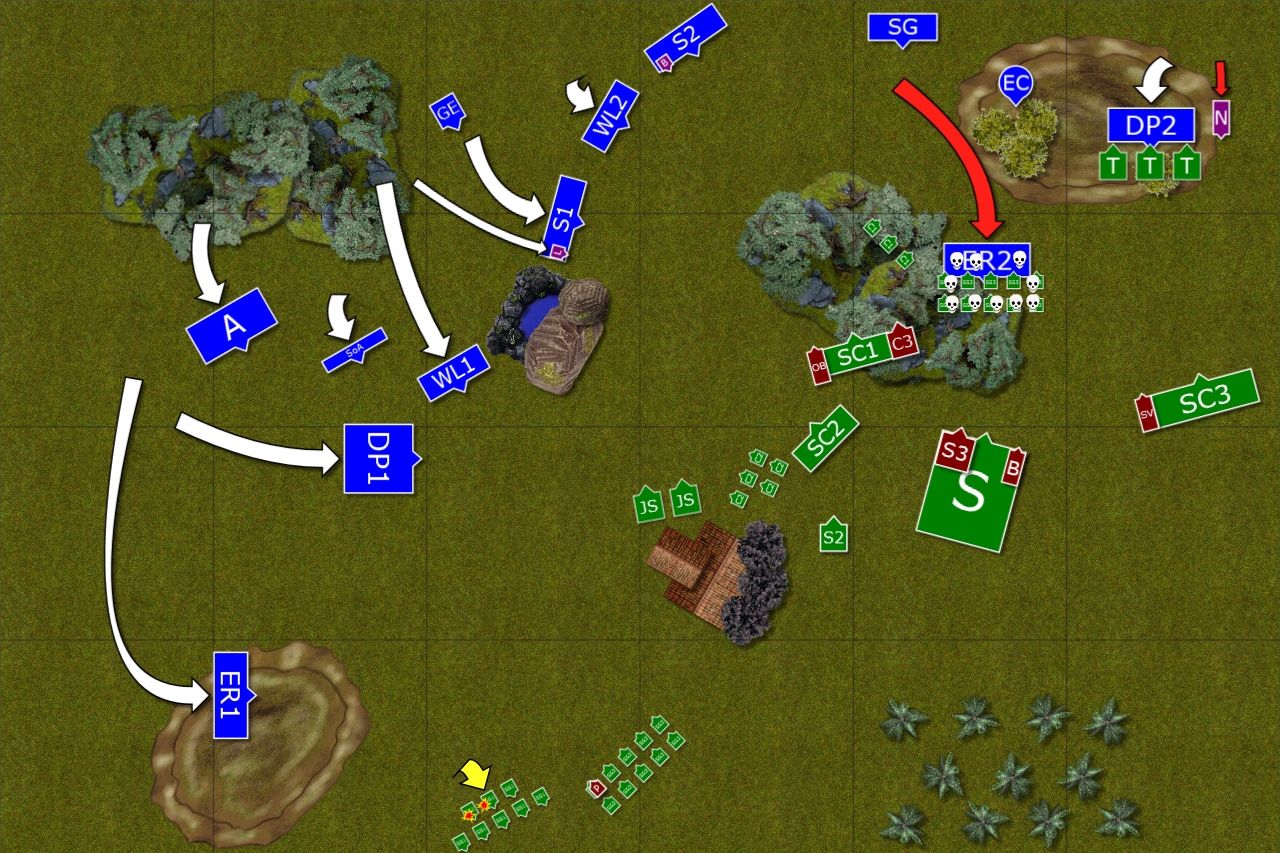
With enemy in range Nasher decided to charge alone and hopefully kill enemy hero before he would start killing his knights. It was a noble sacrifice but he was more than willing to do so. Only his magical lance could assure that the thick armor is penetrated and coldblooded heart pierced. Unfortunately, the steed was shaken by the presence of the nearby terradons and the attack failed.
Reavers charged the nearby Skinks too, easily destroying many lizardmen skirmishers but the remaining few obeyed the orders of the Slann and kept fighting.
Larry tried to get any of his spells through but this time he could not breach Slann's defenses. Archers and Sisters, still at a very bad position, shot at the only available target, the Skinks, and this time managed to panic them. However, they didn't run too far yet.
Turn details
Nasher charge distance: 17", charge roll: 1,2,3
Reaver charge distance: 10", auto
Winds of Magic: 1,6
Channeling: Slann - 1
Power Dice vs Dispel Dice: 7-7
Burning Gaze: 2,4 --> Dispelled: 5,6
Spirit Leach: 1,4,6 --> Dispelled: 3,4,6,6
Ring of Fury: 3
Miasma: 3 --> Dispelled: 5
Lizardmen - Turn 3
 |
| Lizardmen attack! |
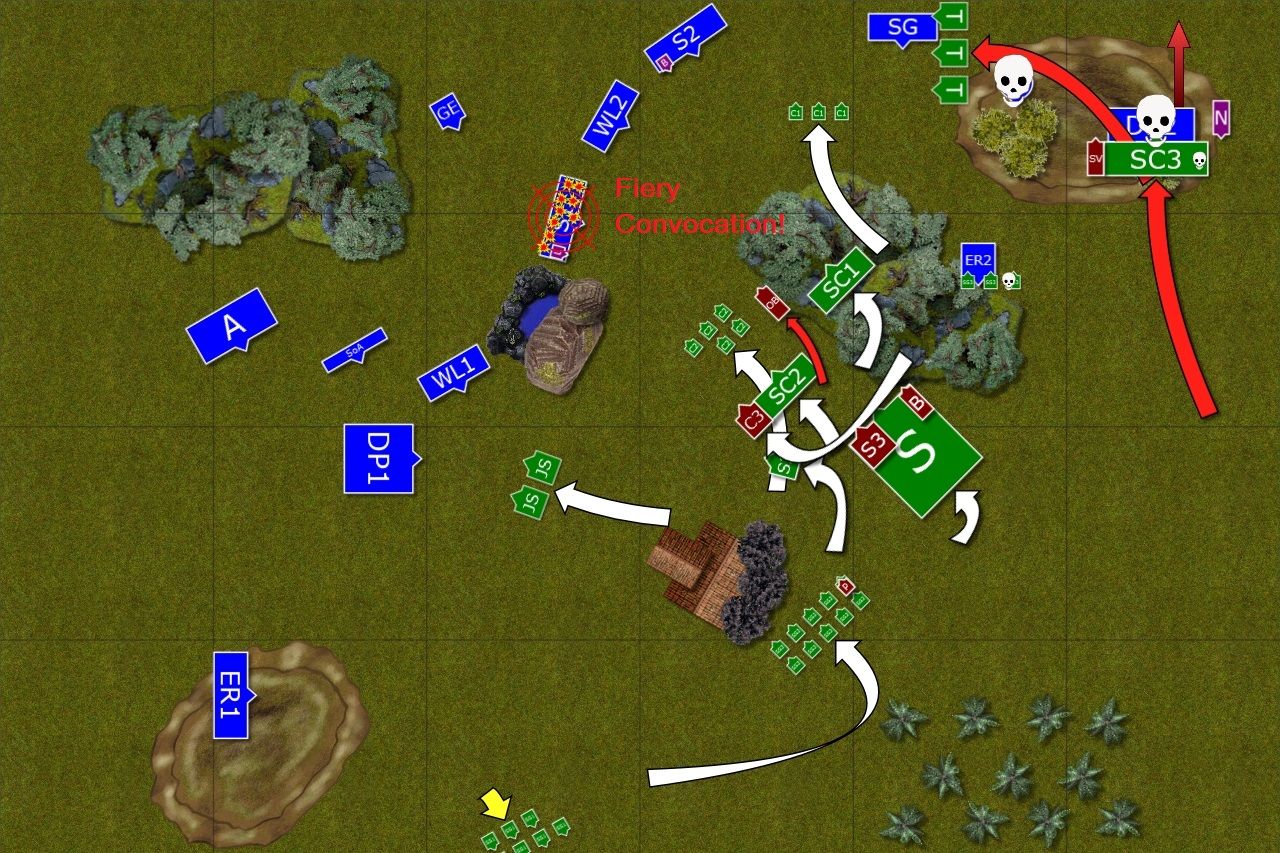
Terradons fly over Dragon Princes and attack Eagle Claw. The crew fights bravely but they are overwhelmed and flying lizards overrun into a flank of a now exposed Sea Guard. That opens the clear path for Cold Ones who attack Dragon Princes. The elven knights have to stand and fight and all die soon but not before one of the Lizards is killed too. The Cold Ones keep up the momentum to carry them out of the possible flank charge of the Elven Noble who helplessly watched the destruction of his companions.
Seeing that Terradons did their job, Old One turned his gaze towards the Elven Wizard-General and charged but it seems the forest slowed him down as his mount was not used to navigate between the trees that were not seen in the jungles of Lustria.
But the unit bodyguarding the Loremaster was not safe. He tried hard to deflect the spell Slann directed at them but failed and the unit burst into fire. Only a handful Swormdasters survived but they held fast.
Turn details
Terradons charge: auto
Cold Ones charge distance: 13" (?), Charge roll: 3,3,5
Old Blood charge distance: 18", Charge roll: 1,3,4
Winds of Magic: 1,5
Channeling: Slann - 2
Power Dice vs Dispel Dice: 8-5
Wildform on CO: 2,4,6 --> No dispel attempt
Fiery Convocation: 2,4,4,5,5 --> Dispel attempt: 1,2,4,5,6
Outcasts - Turn 3
 |
| Elves counter attack! |
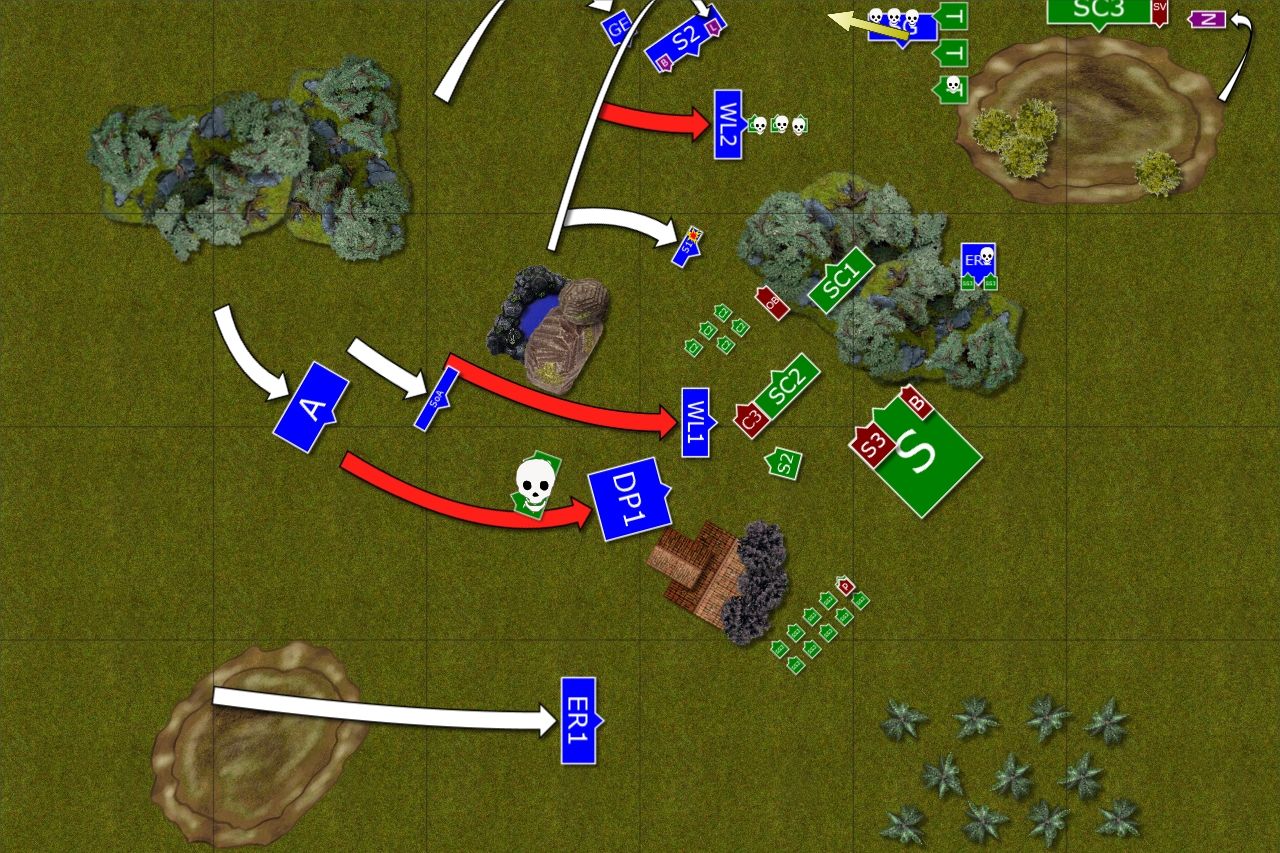
Elves were hard pressed but decided to carry the fight to the enemy. Dragon Princes and White Lions trampled the swarm of jungle lizards and overrun dangerously close to the main combat block of the Lizardmen army. At the same time another unit of Lions cleared out some pesky Chameleons and reformed to block the passage for the Old Blood.
Unfortunately, Sea Guard could not hold against flanking terradons and this time fled for good. Larry the Loremaster fought another mental duel but somehow, trying to scan for the more fragile mind of the skink chief, he lost the concentration and Elven magic yet again proved to be ineffective. What is more, his lack of focus prevented him from dispelling the Fiery Convocation still burning the Swordmasters. (Edit: I would like to thank Hing here for reminding me I could still use my power dice to dispel the spell, I wanted to move on without even trying. Thanks, Hinge! :))
Turn details
Winds of Magic: 4,5
Channeling: None
Power Dice vs Dispel Dice: 9-5
Ring of Fury: 4 --> Dispelled by the priest: 4
Spirit Leach (boosted) --> 1,3,3 --> failed
Fiery Convocation --> dispelling attempt: 1,1,2,5,5
Lizardmen - Turn 4
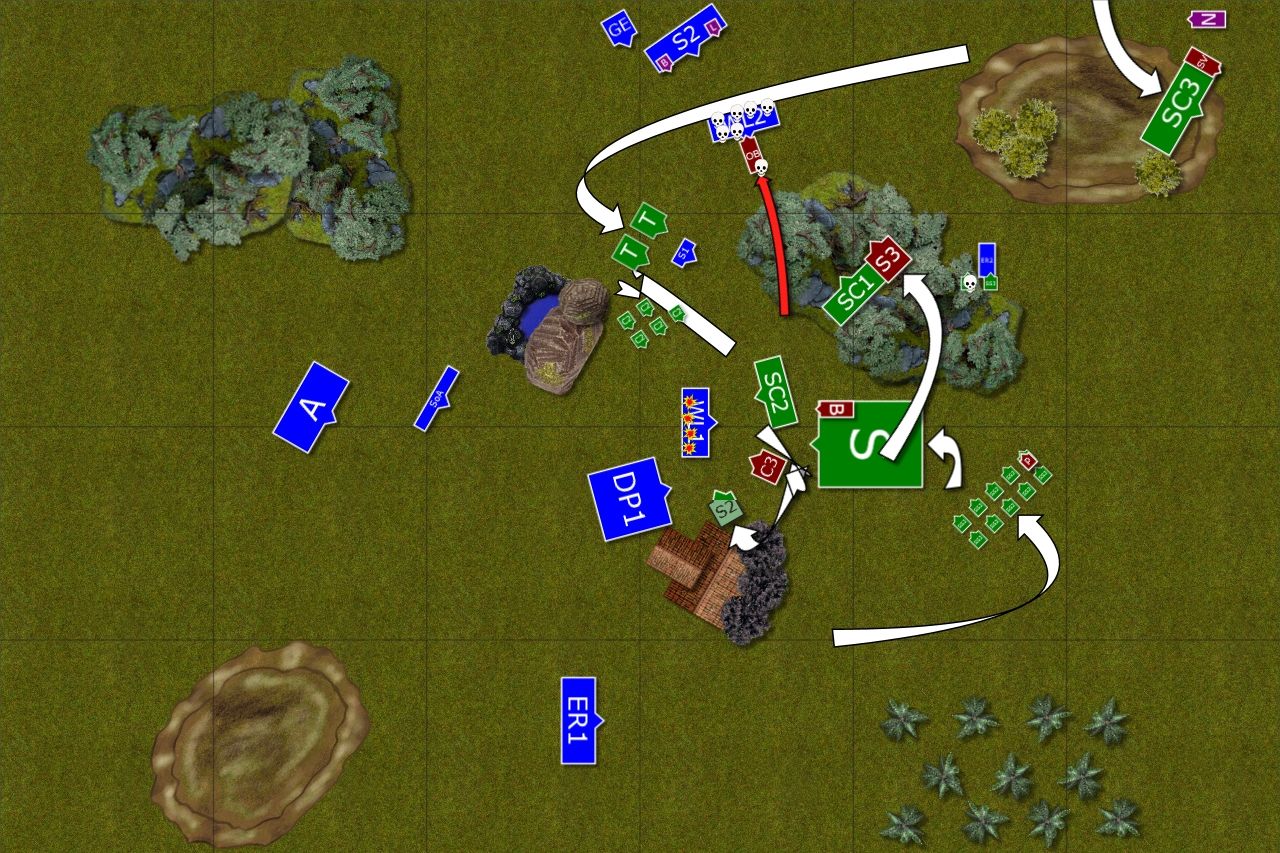 |
| Lizardmen form protective circle around the Saurus block and Slann with his cohort |
Lizardmen consolidated their formation in order to protect the Saurus block with their BSB as well as cohort with the Slann. Old Blood was determined to carry the fight to the enemy and attacked White Lions. Chracians stood bravely and even wounded the Old Blood once but had to pay the price. Six of them died in that combat.
It was clear Elves wound counter but who would emerge victorious from that round?
Turn details
Winds of Magic: 3,6
Channeling: Slann - 1
Power Dice vs Dispel Dice: 10-6
Soul Quench: 1,3,6 --> No dispel attempt --> 2d6 = 2,5
Wildform: 6,6 --> Miscast result: 3,4 --> 1 power dice lost
Fiery Convocation: 2,3,3,3 --> Cast attempt failed
Outcasts - Turn 4
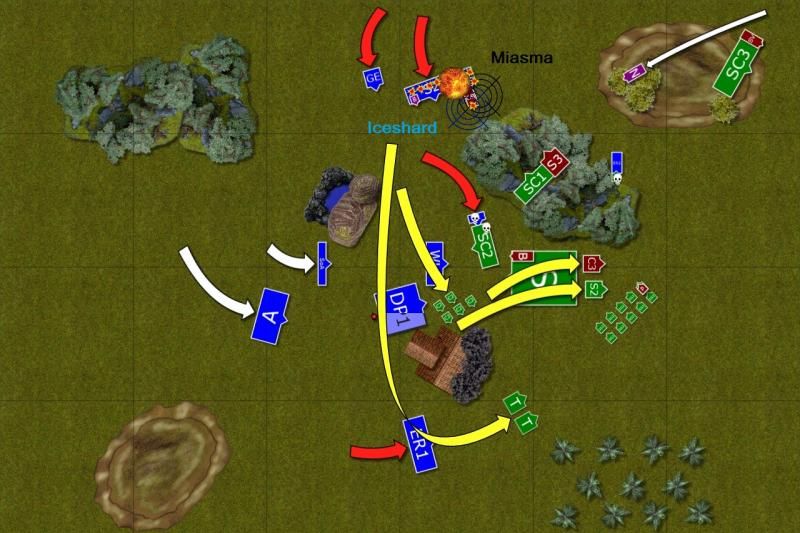 |
| Chain reaction of charges, retreats and redirects! |
It was be or not to be for Elven army. They had to take the fight to the enemy. Dragon Princes tried to reach enemy units but the fast skinks were hard to catch, especially that they used the bigger Saurus as a protection.
Terradons outpaced great eagle and reavers (barely), transporting themselves from one corner of the battle field to another. Finally, Larry and Bob led the Swordmasters to charge Old Blood and hopefully relieve the White Lions.
They needed some magic support to do so and Larry did what he could. Unfortunately, one of the spells backfired and killed 4 lions and 5 Swordmasters. Before Larry got back to his feet, lone Blademaster took on the Old Blood to buy little time for his companions to re-dress the ranks. Larry managed to cast miasma on Old Blood to help him further but Blademaster paid ultimate price anyway.
Turn details
Charges order and reactions:
Dragon Princes at Salamander (flee) --> redirect at Chief (flee)
2 Swordmasters at the flank of the cohort --> hold
Eagle at Terradons (hold)
Swordmasters at Terradons (flee) --> redirect at Old Blood
Eagle redirects at Chameleons (flee)
Reavers at Terradons (flee)
Winds of Magic: 4,4
Channeling: Larry - 1
Power Dice vs Dispel Dice: 9-4
Iceshard Blizzard: 1,6,6 --> Miscast Effect: 2,4 --> 4 (all) Lions dead, 5 Swordmasters dead, 1w on Old Blood, Larry unharmed, 1 power dice lost
Miasma on OB: 4,6 --> Dispel attempt: 1,1,3 --> Spell result: -2 WS
Earthblood: 2,3 --> Cast attempt failed, end of magic phase
Lizardmen - Turn 5
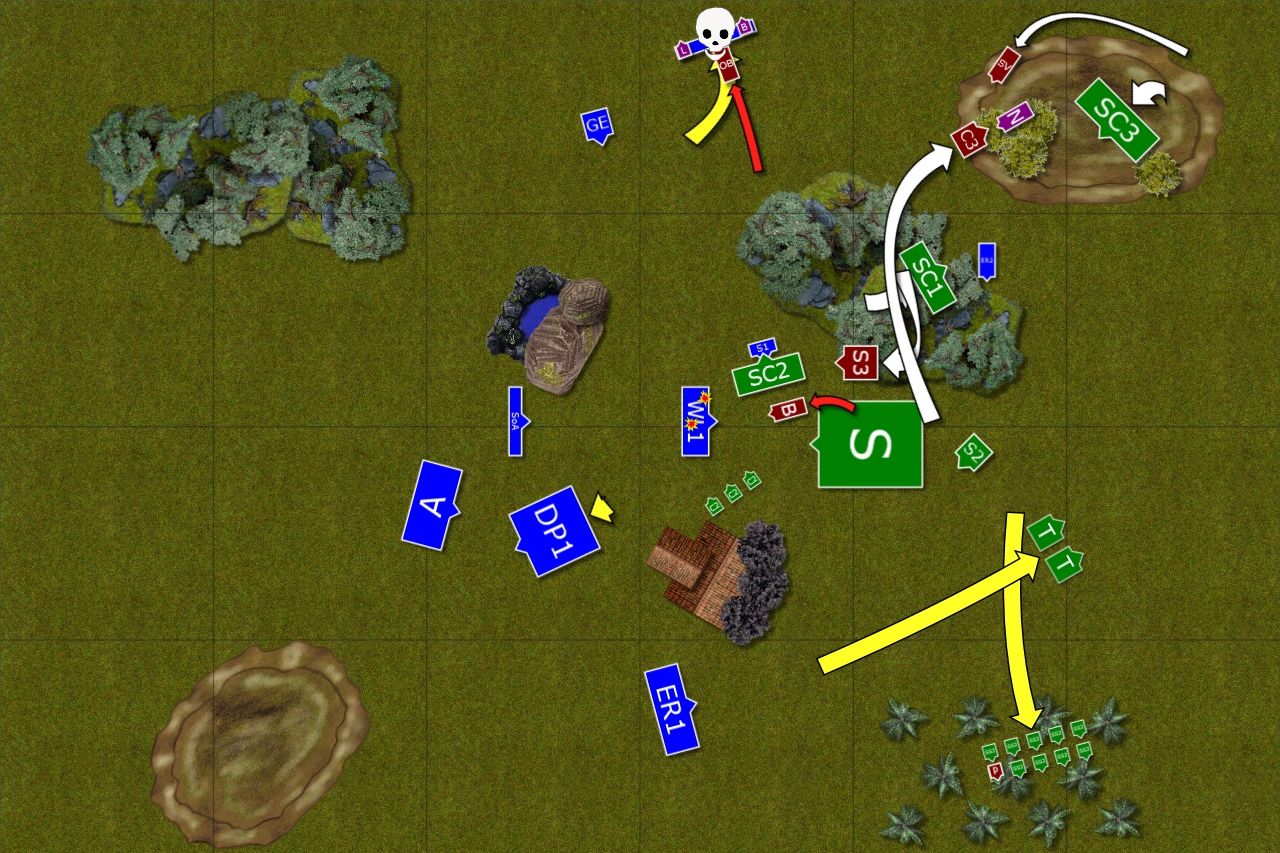 |
| Old Blood wins the battle all by himself! |
Fleeing troops rallied with an exception of terradons who were too far from the Slann to obey his orders. In addition, that panicked skinks and the priest. But that was a minor disturbance to the plan. Chief swiftly landed in front of the Elven Noble and Scar Veteran started to outflank him while his Cold Ones did the same from the other side.
BSB charged another unit of the elven knights all by himself but they knew they stand no chance like that and retreated.
Larry and Bob were still recovering from the magical feedback, they didn't manage to re-dress the ranks when the Old Blood was upon them, invigorated by the healing effect of a spell. Swordmasters fought as best at they could but simply could not penetrate thick hide of the Old Blood and were smashed in return. The formation broke entirely and Old Blood trampled them all. (Edit: Hinge called a challenge and I decided to decline. He sent BSB to the "rear" rank and I could not use his re-rolls. I lost combat by 1 and rolled 5,6 for break test. The unit was caught in pursuit).
That was the hardest blow Elven army suffered and it was clear they would not be able to recover from that. It was now the matter of retreating in good order.
Turn details
BSB charges Dragon Princes (flee) --> distance after retreat - 15" --> charge roll: 1,1,2
Winds of Magic: 2,4
Channeling: Slann - 2, Larry - 1
Power Dice vs Dispel Dice: 8-5
Soul Quench: 1,3,4 --> no dispel attempt --> 2d6 = 1,1
Drain Magic: 2,3,4 --> dispelled: 1,1,2,3,5
Apotheosis (boosted): 5,6 --> d3 roll = 1 --> one wound recovered
Outcasts - Turn 5
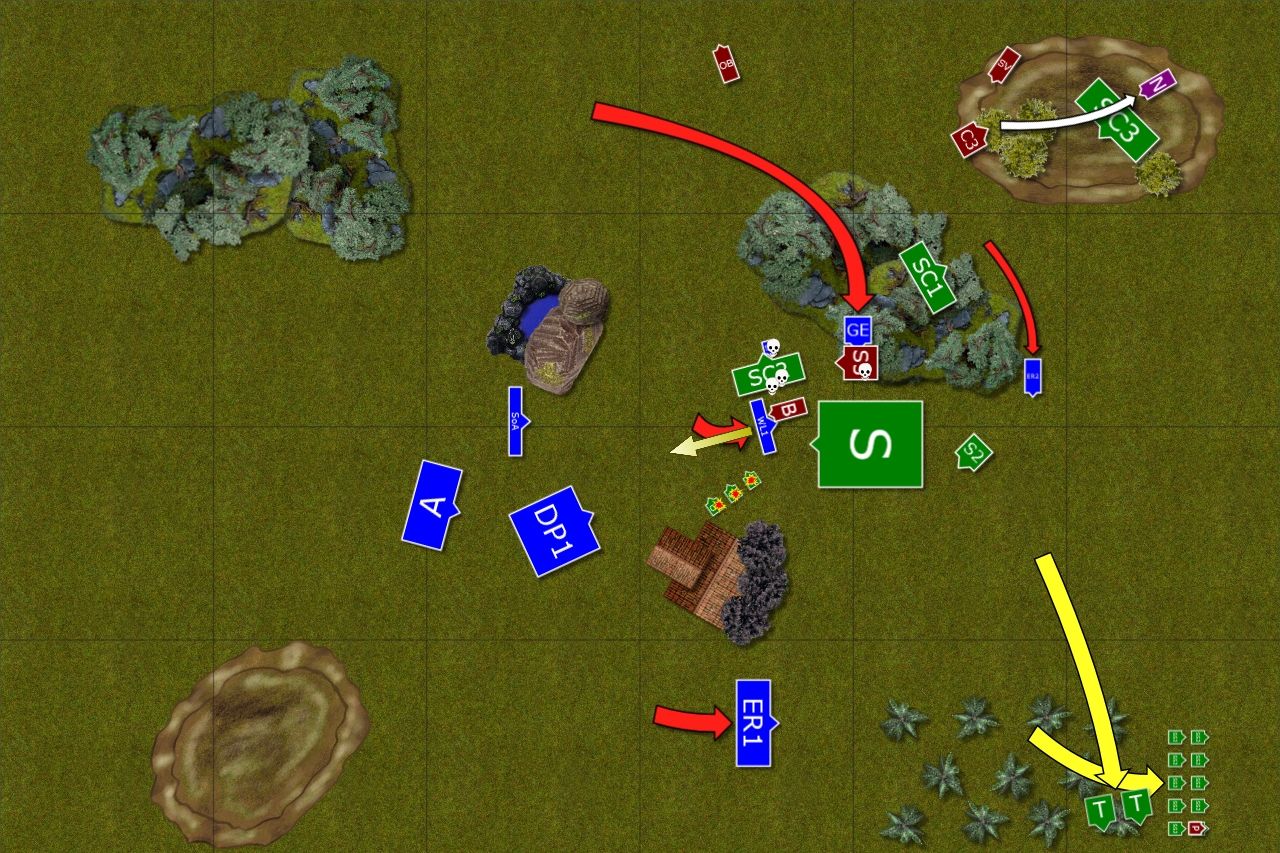 |
| Desperate attacks by the survivors |
With general and bsb lost Elven warriors lost their hearts. The battle was lost and there was little they could do. Some of them desperately attacked. 4 Lions jumped at the lone BSB but the beast was not easy to hurt and killed all Chracians.
Light cavalry chased the skinks and terradons but they were hard to reach again. Even eagle swooped down and attacked lone Slann, wounding it.
Lizardmen - Turn 6
Light cavalry chased the skinks and terradons but they were hard to reach again. Even eagle swooped down and attacked lone Slann, wounding it.
Lizardmen - Turn 6
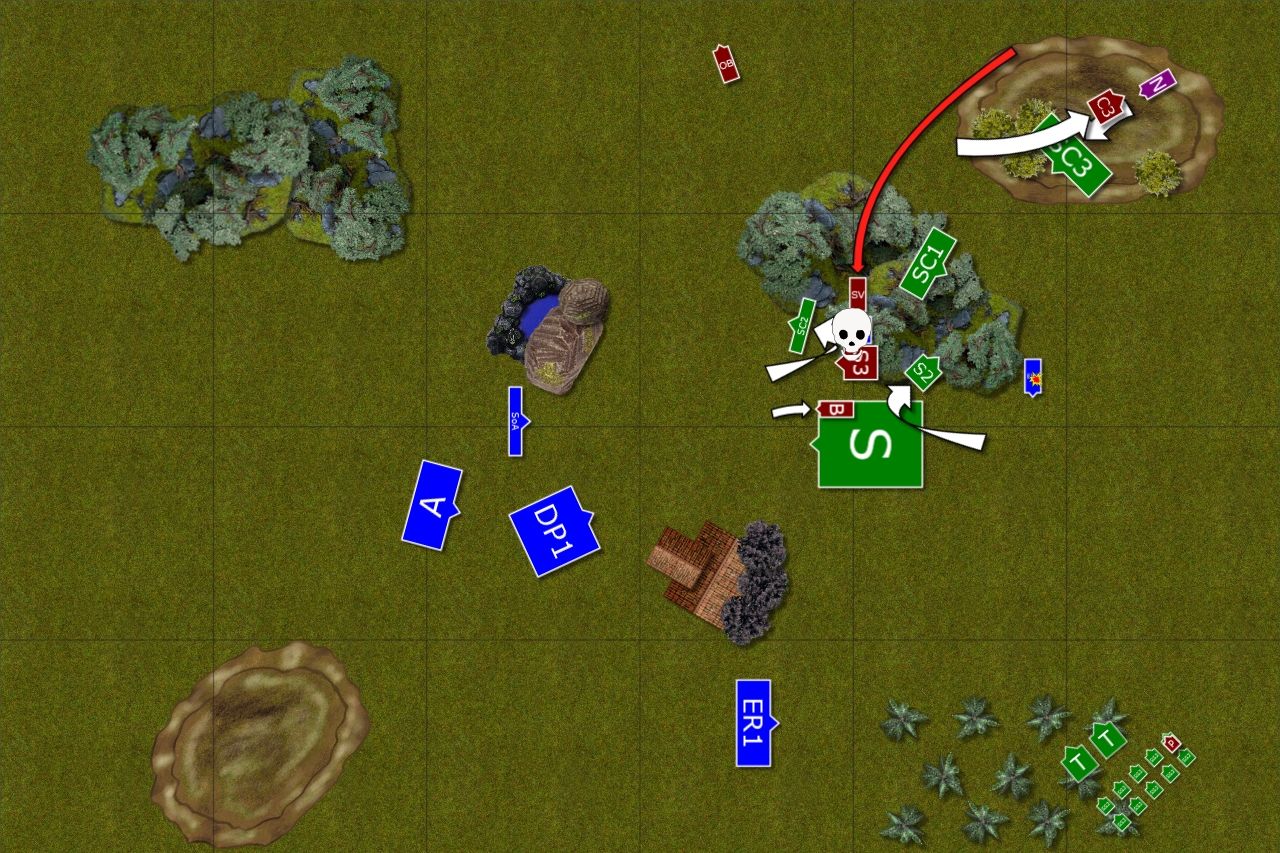 |
| Scar Veteran comes to the rescue |
Lizardmen consolidate their position once again. Scar Veteran comes to the rescue and the eagle is killed, not to bother the peace of the Slann anymore. Chief again blocks Elven Noble from charging other targets. Light troops rally too.
Slann, seeing that the day is won, orders Old Blood to take the command of the army and enters deeper state of meditation in order to contemplate the plan of the Old Ones further.
Outcasts - Turn 6
 |
| Parting Shots! |
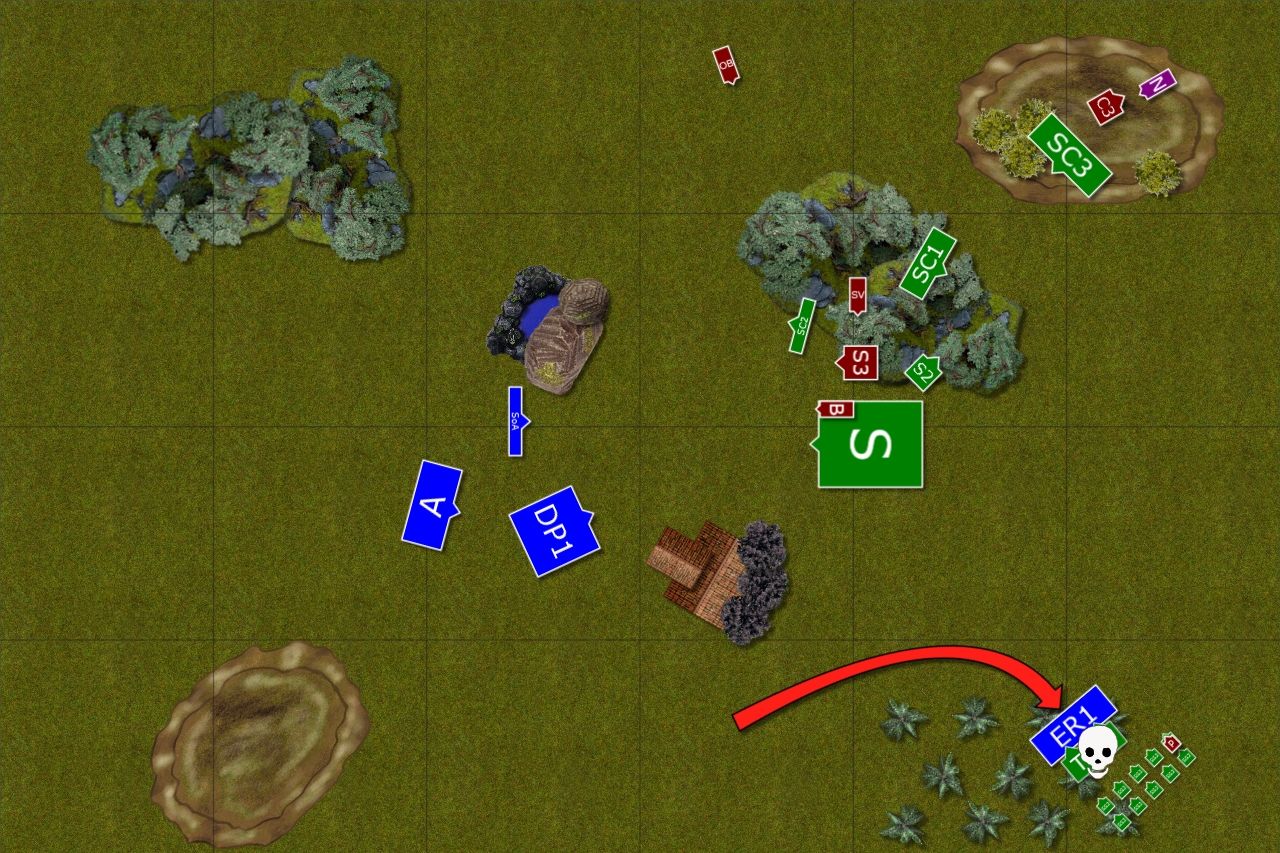
Elven warriors could not do much at this stage. Reavers charged terradons to make sure no fliers would scout for the Slann to cover their retreat. Terradons were destroyed but the skinks who witnessed that didn't care.
Finally, Archers attempted hard task of assassinating the Slann from the distance. They wounded the enemy general twice and his skink and saurus minions were too slow to protect him but the Shield of the Old Ones did its job. (Edit: I wounded the Slann twice, Hinge failed his 4+ Look out Sir rolls but passed both ward saves.)
With these parting shots survivors of the Elven army withdrew from the battle field.
Summary
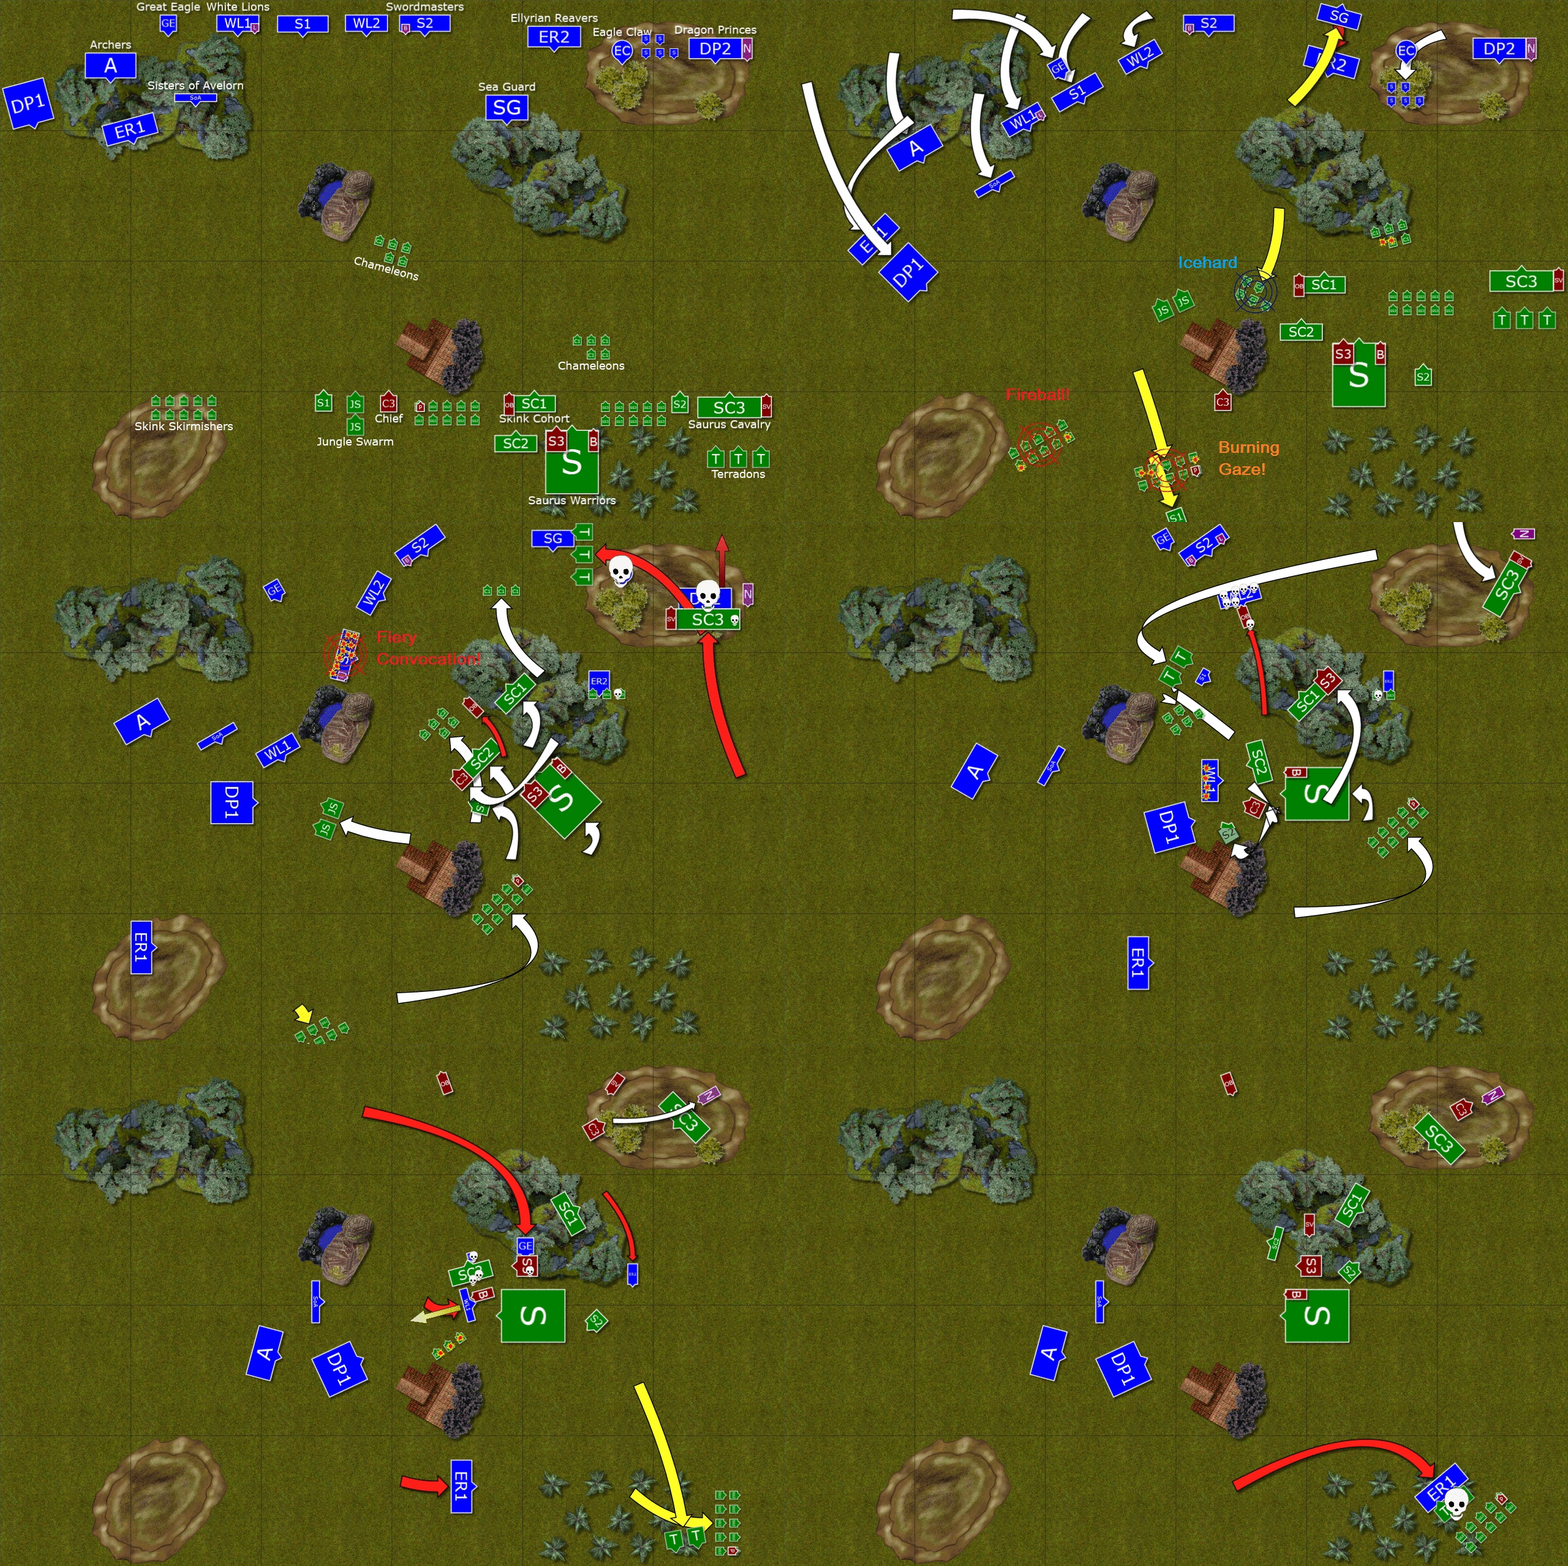
After-battle thoughts
Ouch! That was painful defeat. When I lose my characters it is almost always a huge loss. No wonder, they are very expensive indeed.
But let me start with congratulations to Hinge for a great game and teaching me a few valuable lessons! He had a very good deployment, firm plan and perfect execution. In particular, the sequence of charge reaction turn 4 was something I admire the most. The use of the support units was unparalleled and I would love to show that to anybody who calls such units "chaff" and uses them only to throw under the bus and get them killed for nothing.
Hinge not only positioned them so that I could not attack the Slann but fled with them in such a way that stalled the attack of my troops and I didn't gain anything with my charges. What is more, these regiments remained alive and were very useful again. Even when they didn't rally I had to spend another two turns hunting them down. I didn't succeed fully and it didn't matter anymore.
I think Hinge made only one mistake with Salamander and Skinks at the beginning of the game. Even solo charge with the Old Blood that could have ended with its loss (I will explain my point soon) was calculated risk. It worked and netted Hinge huge amount of VP. But even if it didn't he still had hitting power to break the back of my army.
Well done, Hinge! It was an honor to play against you and learn from you first hand!
Unfortunately, I feel the mistakes I made contributed to the overall defeat too.
1. Deployment - I deployed my units badly and could not use shooters to the effect. They were too far, too late and even with a few good shots that eliminated skinks and chameleons they didn't contribute to the game/it was too late.
2. Nashers charge/positioning - Looking at the game with the benefit of a hindsight I can tell that the solo charge with Nasher was not the best option. I am not saying he didn't have a chance to kill SV with his star lance. But the problem was that I left Terradons unchecked and totally ignored the fact they can simply fly over the knights to charge eagle claw.
I think the better option was to charge terradons with noble, as they would have to hold the charge and withdraw with DP so they could be a little further from CO. If terradons held then it is good as they would have blocked CO from charging the noble. If they fled I think I had a chance to flee through units.
In fact, I still had reavers I could use to divert them.
I had a chance to avenge Dragon Princes but made another mistake and placed Nasher too close and at shallow angle so that when CO got back they could move out of his arc of sight and avoid the charge. Later on he was easily blocked by the chief and I didn't want to risk the Egg to explode into his face.
3. Spells dispelling priority/Combat with Old Blood - Charging Old Blood with Swordmasters was premature. I should have let him to fight lions and await his charge next turn. It is not because I had a miscast that evaporated Lions before they could strike but because I would have had more time.
When I had Old Blood on single wound I decided to dispel drain magic to keep the hexes on the enemy. I think it was a mistake and I should have dispelled apotheosis. Thus keeping him on that single wound. I also had an option to accept the challenge or not. I decided to decline but it was tough call for the Swordmasters with 6 S5 attacks total to wound OB twice and count on failed armor and ward saves.
If I dispelled apotheosis instead I had a better chance to kill him. Accepting challenge with Larry would give him a chance to wound OB better and would keep that fight for one more round. On the other hand, due to hexes OB hit only once but unfortunately it was enough for him to break the unit and catch it in pursuit.
4. Desperate charges - There was no need for Lions to charge BSB. I did wound him twice but he had 1+/4++ save so it was another situation where the chances to wound were very low. I might have lost them anyway but there was no need to lose them like that. At the same time I think I should have charged the cohort with 2 remaining Swordmasters from the flank as that would have kept them alive longer and maybe even threaten Slann.
Despite the huge defeat I did enjoy the game and I hope I will have a chance for rematch sometime (although it is quite difficult to organize it with all this time travel :)).
Thanks for reading and I hope you enjoyed the report! If you did, please, leave a comment or two!

No comments:
Post a Comment